

Download this new 2019 Excel Calendar Template and create your own personalized calendars in Excel. The calendar template can be used to create calendars for any year. You can choose from 19 different calendar designs, including annual (yearly), monthly, weekly and daily calendars. All in one file, free to download.
Topics in this post (2019 Calendar Template)
- Features of 2019 Calendar template
- How to download this template for free?
- Instructions on how to use the template
- 19 Calendar designs – their features
- Tips to further customize the template

FEATURES OF 2019 CALENDAR EXCEL TEMPLATE
- Customize calendars by choosing the Year, Starting month and Starting day of week.
- Enter Holidays and Personal Events to display on the Calendars
- Automatically creates 19 Calendar designs (as this is 2019 )
- 12 (of the 19) designs automatically list the Holidays and events
- 2 (of the 19) designs allow typing events directly on the calendar itself
- All 19 designs are ready to be printed. Can be Exported to PDF as well.
- Easy to change formatting (font size, font, text colors, fill colors)
DOWNLOAD 2019 CALENDAR TEMPLATE
VIDEO DEMO

HOW TO USE THE TEMPLATE
Overview of steps
- Enter Basic settings
- Choose Weekends
- Enter Holidays
- Enter your personal or company Events
- Pick a Calendar design
- Print or export the calendar to PDF
Now, let’s see each step in detail.
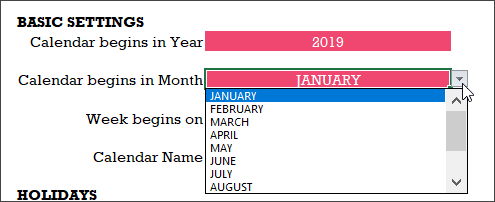
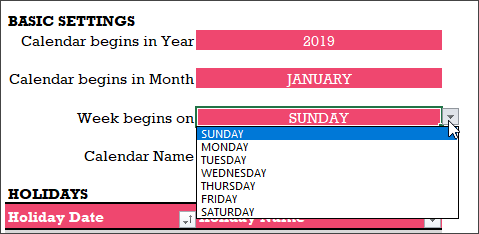
Step 1: Enter Basic settings
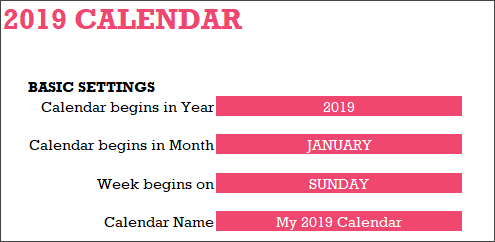
Enter the year for which you want to build the calendar. I designed it such that you can enter any year and the calendar will still work.
By default the year begins in January. However, you can modify that to start the calendar with any month.
By default, the calendar shows weeks starting in Sunday. However, you can modify it to start with any weekday.
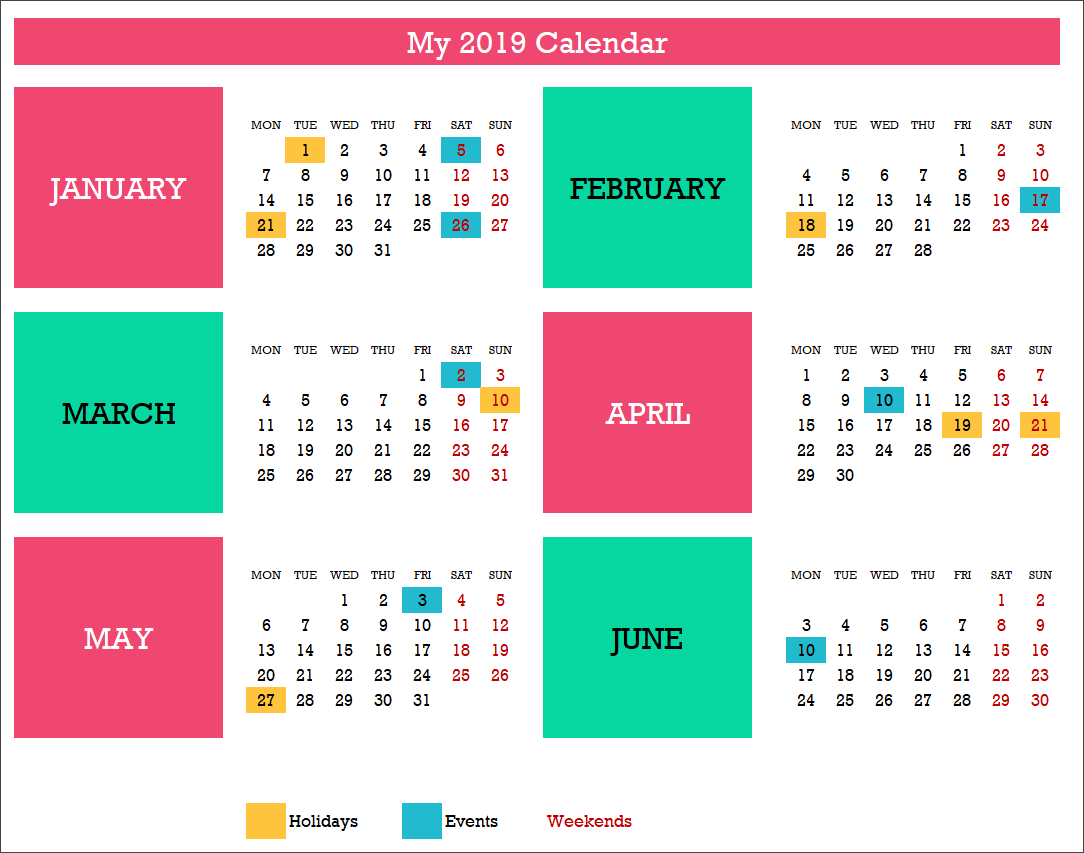
We can give a name to our calendar and the name will appear on some of the calendar designs automatically.
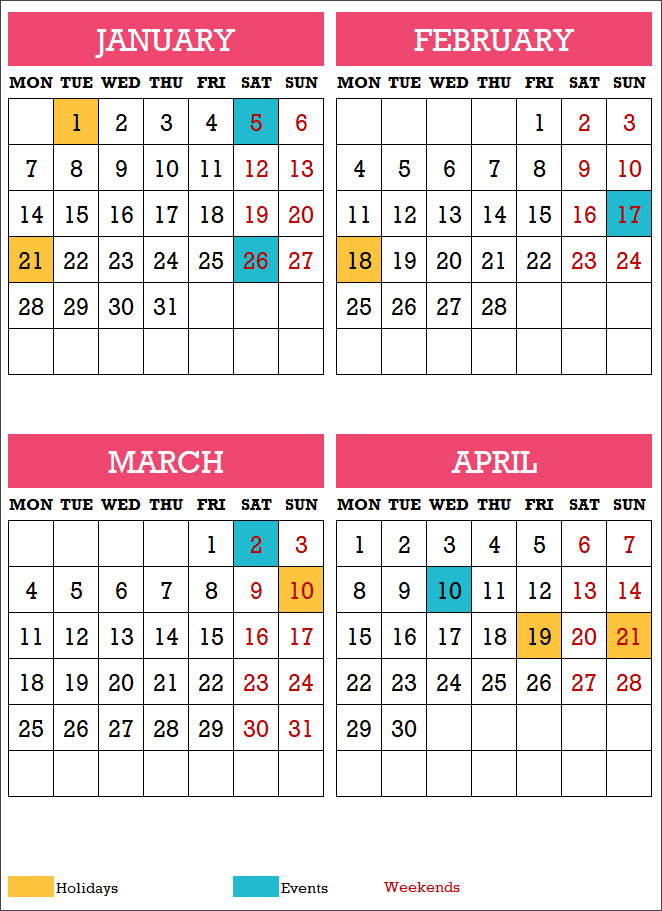
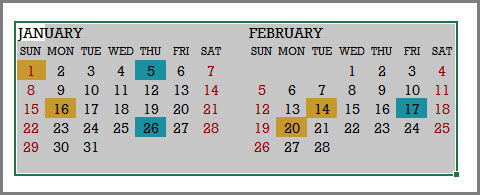
Step 2: Choose Weekends
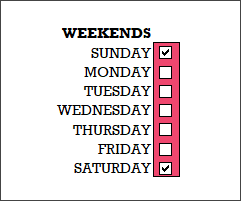
Calendars show weekend days in red colored font. You can modify the weekends as needed for your purpose. In the image above, I have selected Saturday and Sunday as weekends. So, all Saturdays and Sundays will be shown in red font on the calendars.
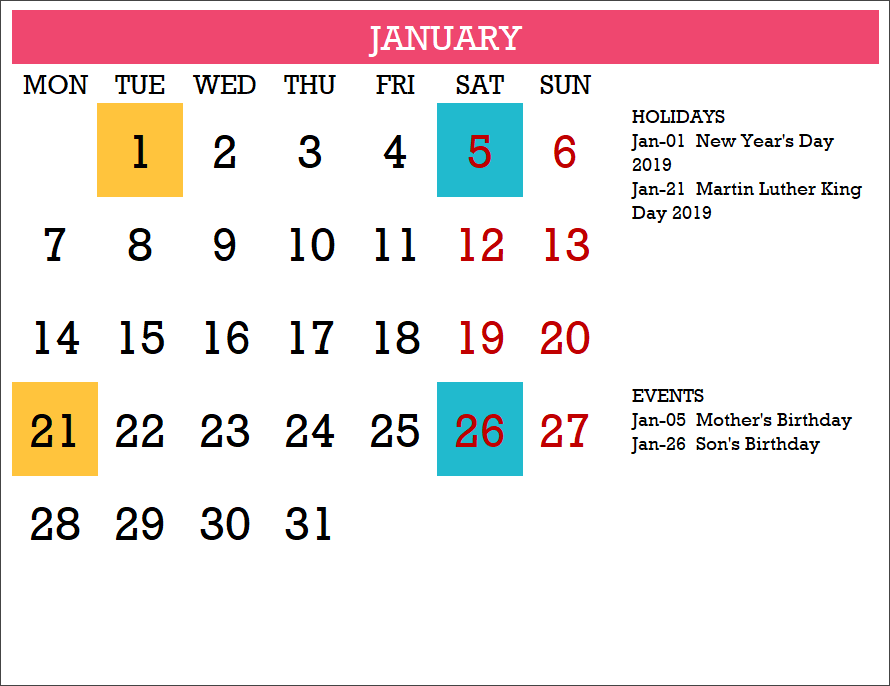
Step 3: Enter Holidays
Enter the list of holidays for your company or business in the Holidays table.
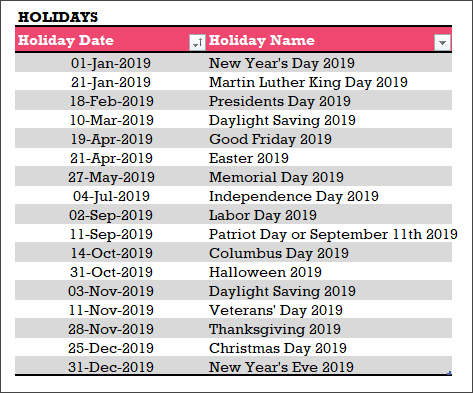
I have provided a list of holidays in U.S. and India for reference. Please see the Holidays sheet.
I have used Excel Tables for user input. If you are new to Excel tables, please see my article on How to use Excel tables for data entry?
Step 4: Enter your personal or company Events
The template allows the user to enter events, in addition to holidays, to display on the calendars.
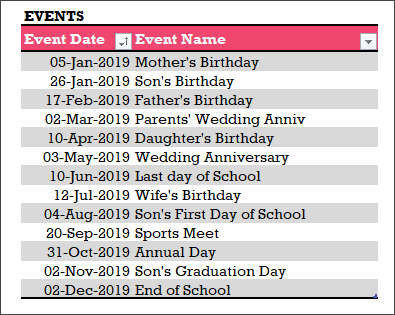
If you are using this template for personal calendar, you can enter your personal events as I have done in the above image.
If you need to create a calendar for your company, enter your company events for 2019 in the Events table.
Step 5: Pick a calendar design from the 19 designs
Based on the input provided in the previous 4 steps, the template builds the calendar designs automatically.
The 2019 calendar template offers 19 different calendar designs to choose from.
In the Pick a Calendar sheet, we can see the 19 designs.
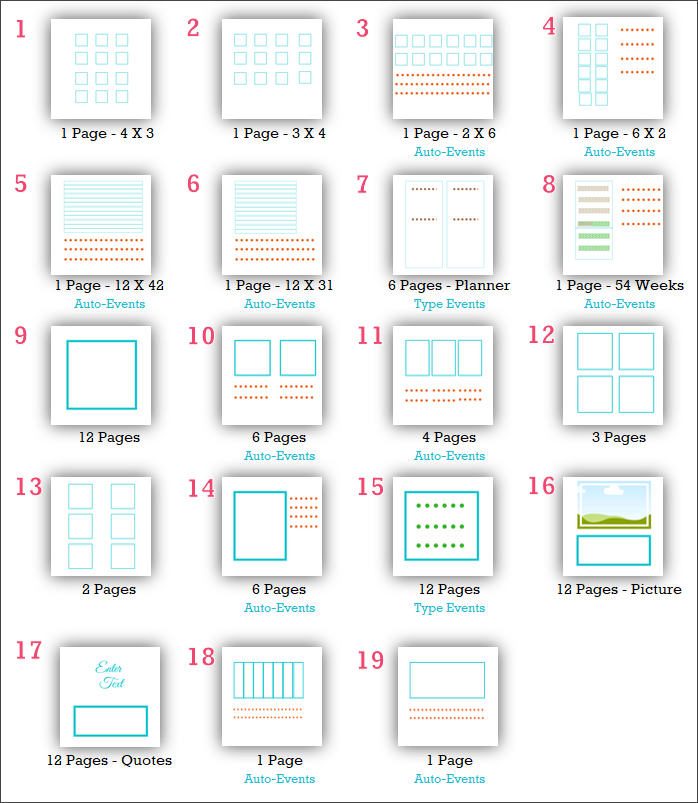
Just click on any design on and you will be taken to the corresponding calendar sheet.
You can also directly go to any of the sheets named 1 to 19.

Note: If you change the sheet names of the calendars, then hyperlinks in the Pick a Calendar sheet will not work.
Step 6: Print the calendar or export to PDF
Excel’s default print menu options and Export options work as usual. If you are not familiar, it is not a problem. I explain them in detail with screenshots towards the end of this post.
19 CALENDAR DESIGNS
Let’s look at each of the 19 calendar designs.
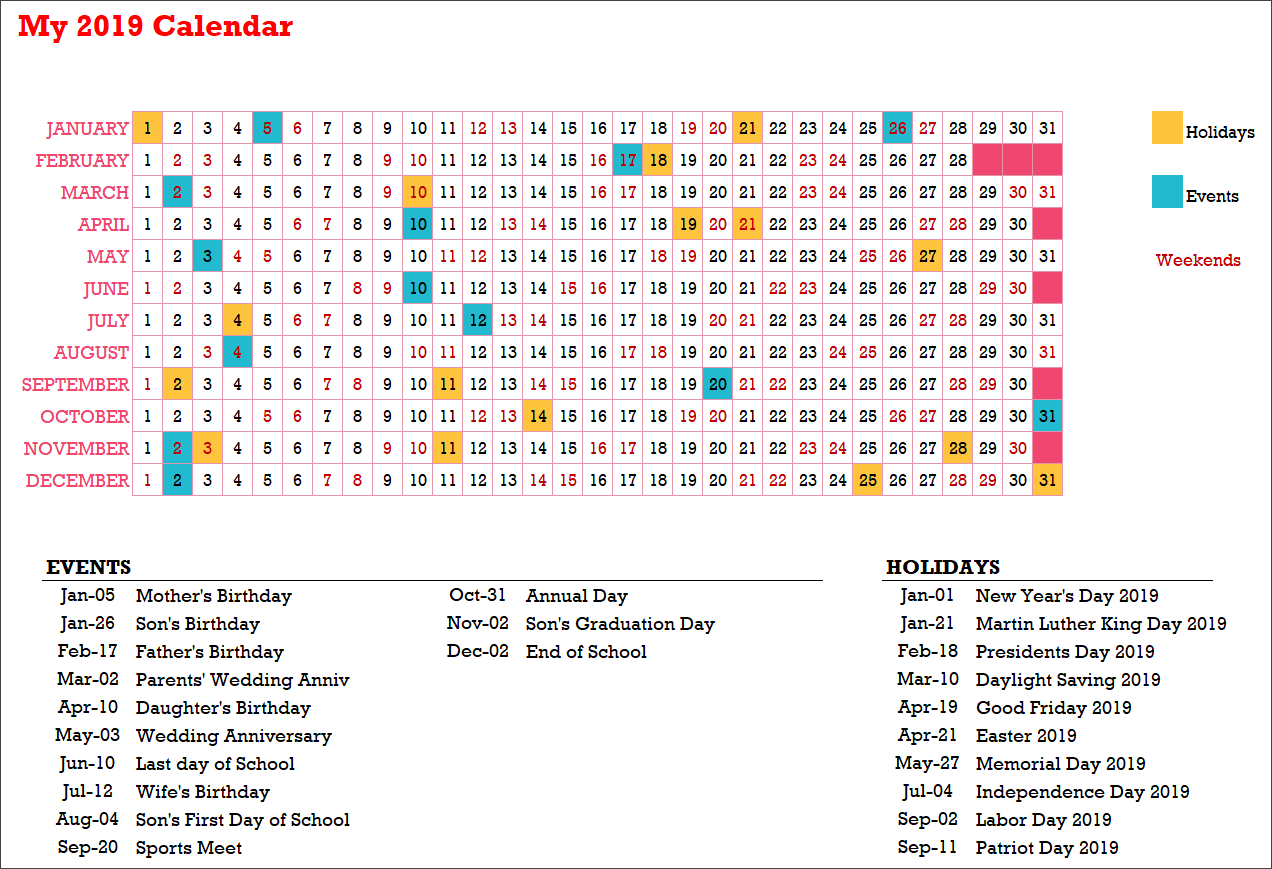
Calendar Design 1
1 Page 12 Months – 4 X 3
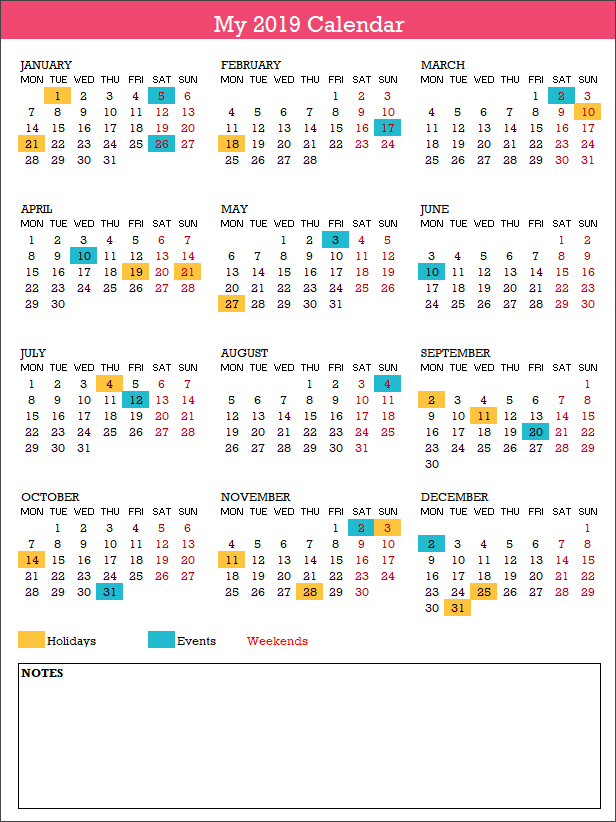
- This design prints the entire year in 1 page.
- The 12 months are shown in 4 rows X 3 columns.
- The Holidays, Events and Weekends are highlighted on the calendar.
- Holiday Names and Event Names are not listed in this design.
- There is a place to enter any notes at the bottom of the page.
When both Event and Holiday fall on the same day, Event is prioritized and event color is displayed.
Calendar Design 2
1 Page 12 Months – 3 X 4
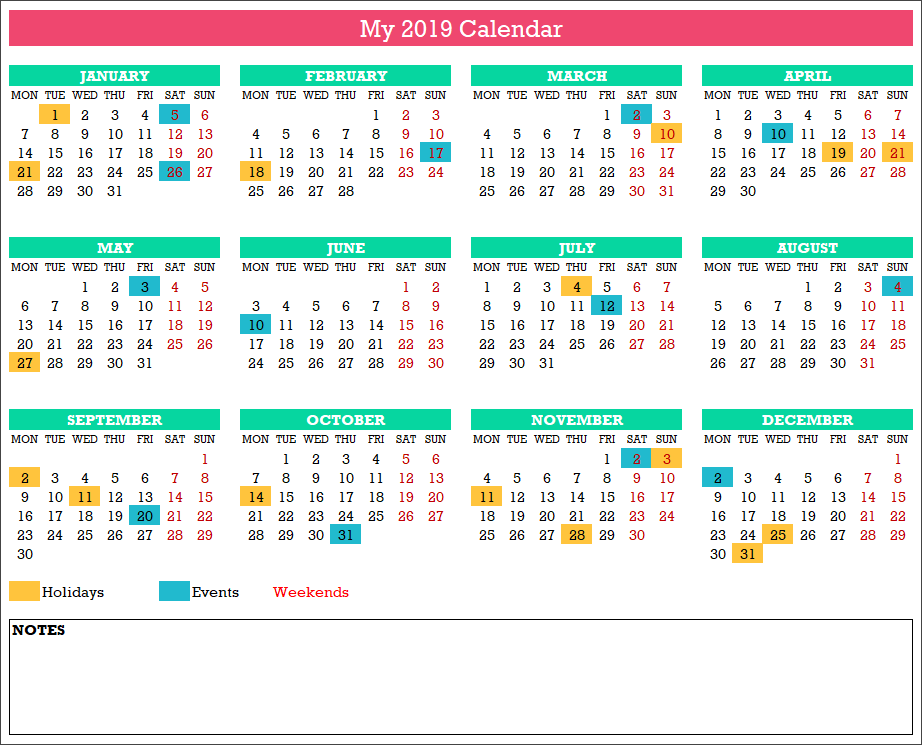
- This design prints the entire year in 1 page.
- The 12 months are shown in 3 rows X 4 columns.
- The Holidays, Events and Weekends are highlighted on the calendar.
- Holiday Names and Event Names are not listed in this design.
- There is a place to enter any notes at the bottom of the page.
Calendar Design 3
1 Page 12 Months – 2 X 6 with Events
- This design prints the entire year in 1 page.
- The 12 months are shown in 2 rows X 6 columns.
- The Holidays, Events and Weekends are highlighted on the calendar.
- 20 Holiday Names and 20 Event Names are listed in this design.
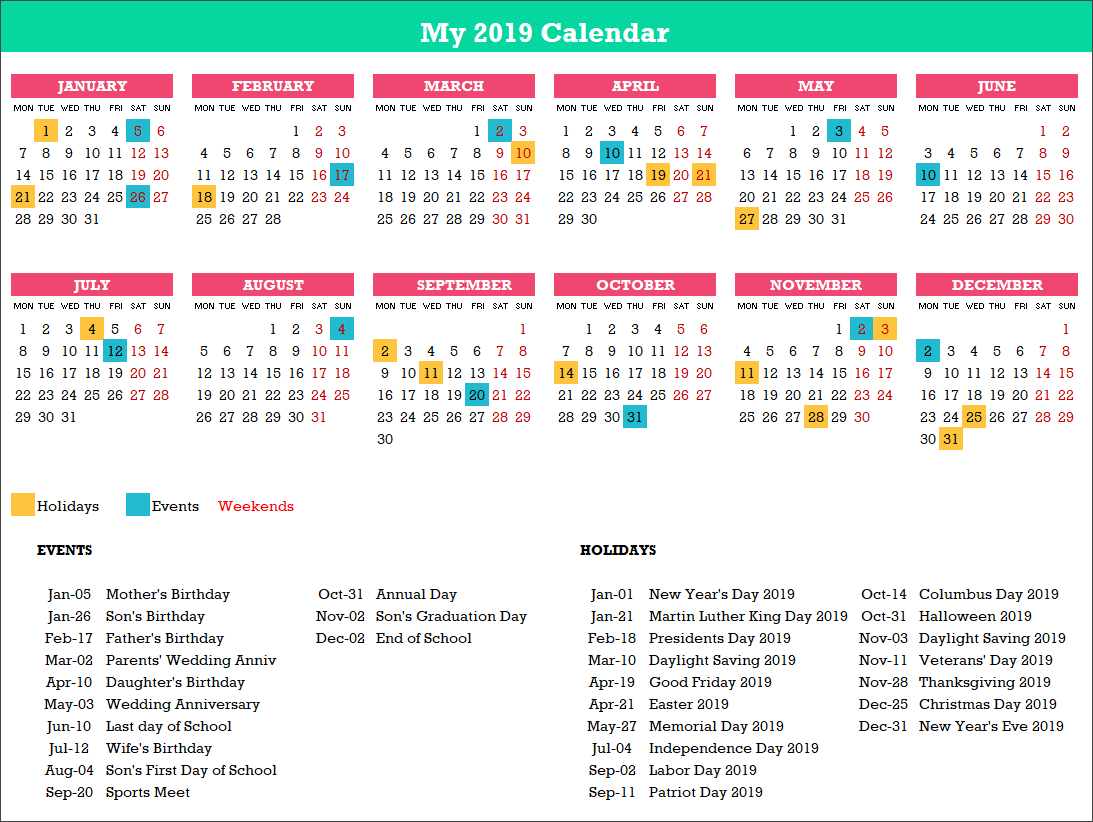
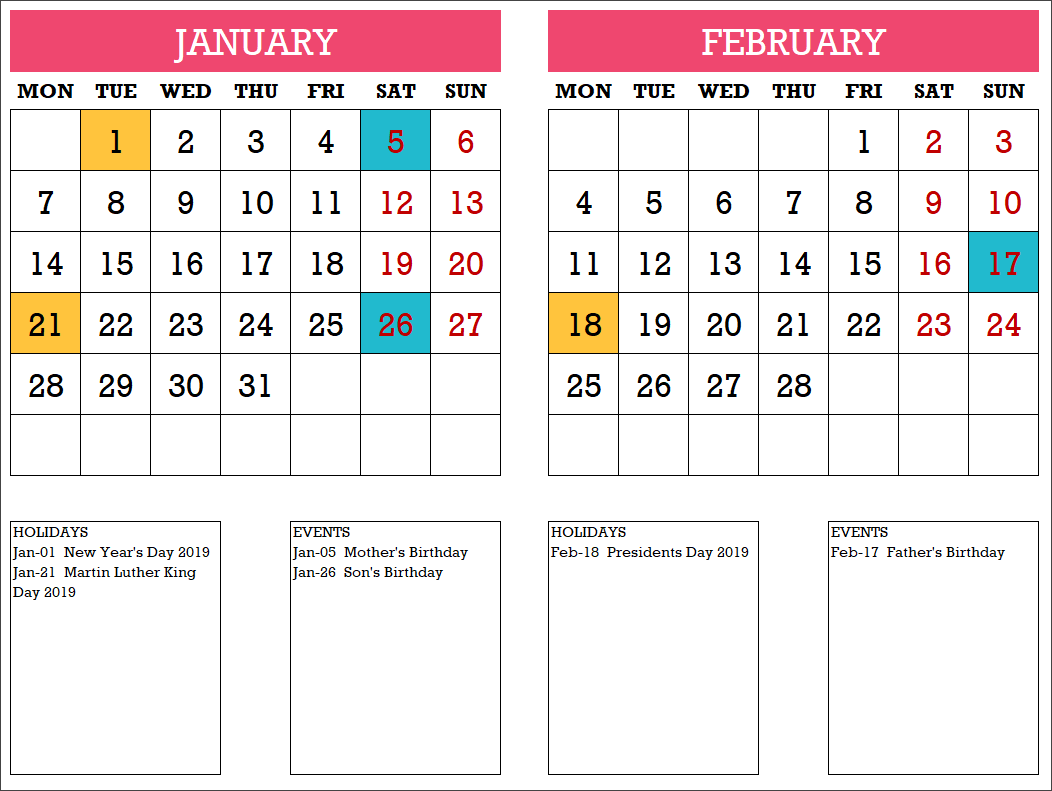
Calendar Design 4
1 Page 12 Months – 6 X 2 with Events
- This design prints the entire year in 1 page.
- The 12 months are shown in 6 rows X 2 columns.
- The Holidays, Events and Weekends are highlighted on the calendar.
- 20 Holiday Names and 30 Event Names are listed in this design.
Calendar Design 5
1 Page 12 Months – 12 X 42 with Events

- This design prints the entire year in 1 page.
- The 12 months are shown in 12 rows X 42 columns.
- The Holidays, Events and Weekends are highlighted on the calendar.
- 10 Holiday Names and 20 Event Names are listed in this design.
Calendar Design 6
1 Page 12 Months – 12 X 31 with Events
- This design prints the entire year in 1 page.
- The 12 months are shown in 12 rows X 31 columns.
- The Holidays, Events and Weekends are highlighted on the calendar.
- 10 Holiday Names and 20 Event Names are listed in this design.
Calendar Design 7
6 Pages – Planner
- This design prints the entire year in 6 pages.
- The 12 months are shown in 31 rows X 12 columns.
- The Holidays, Events and Weekends are highlighted on the calendar.
- Holiday Names and Event Names are not listed in this design.
- Type notes directly next to each date on the calendar.
Calendar Design 8
1 Page – 54 Weeks – with Events
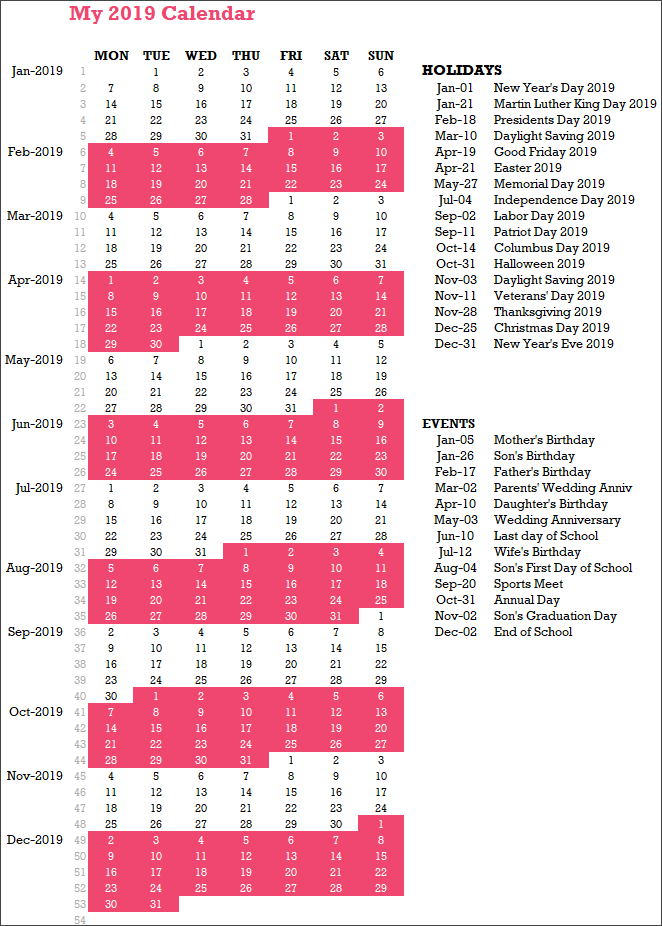
- This design prints the entire year in 1 page.
- The 12 months are shown in 54 rows X 7 columns.
- The Holidays and Events are not highlighted on the calendar.
- 20 Holiday Names and 30 Event Names are listed in this design.
Calendar Design 9
12 Pages – Monthly
- This design prints the entire year in 12 pages.
- The 12 months are shown as one month in each page and each month as 6 rows X 7 columns.
- The Holidays, Events and Weekends are highlighted on the calendar.
- Holiday Names and Event Names are not listed in this design.
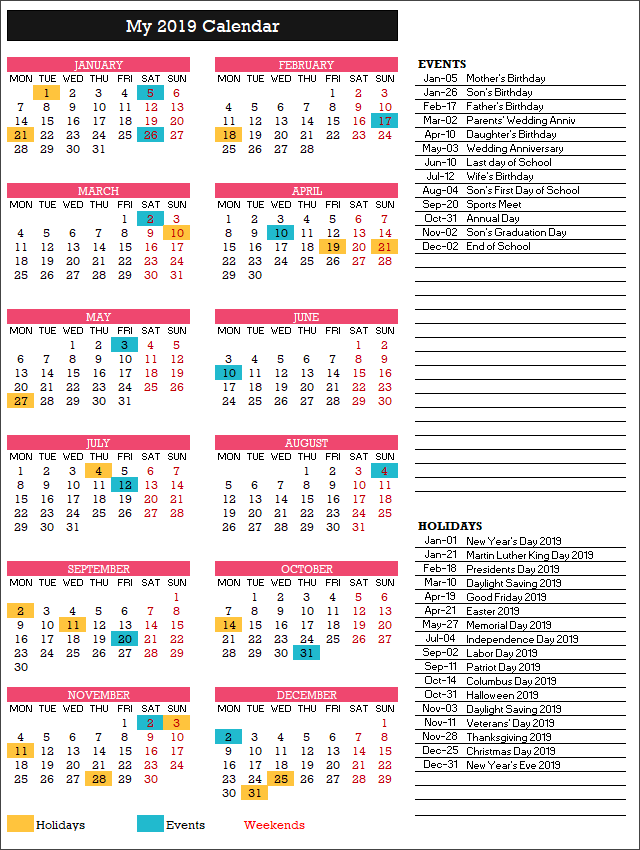
Calendar Design 10
6 Pages – with Events
- This design prints the entire year in 6 pages.
- The 12 months are shown as 2 months in each page and each month as 6 rows X 7 columns.
- The Holidays, Events and Weekends are highlighted on the calendar.
- 10 Holiday Names and 10 Event Names are listed for each month in this design.
Calendar Design 11
4 Pages – with Events
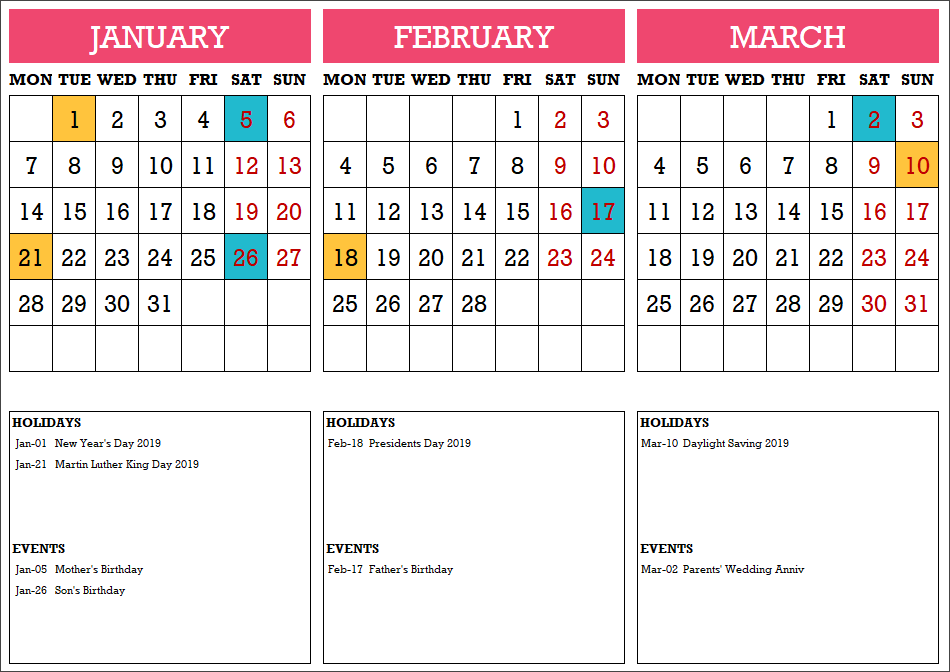
- This design prints the entire year in 4 pages.
- The 12 months are shown as 3 months in each page and each month as 6 rows X 7 columns.
- The Holidays, Events and Weekends are highlighted on the calendar.
- 5 Holiday Names and 5 Event Names are listed for each month in this design.
Calendar Design 12
3 Pages – 4 Months on each page
- This design prints the entire year in 3 pages.
- The 12 months are shown as 4 months in each page and each month as 6 rows X 7 columns.
- The Holidays, Events and Weekends are highlighted on the calendar.
- Holiday Names and Event Names are not listed in this design.
Calendar Design 13
2 Pages – 6 Months on each page
- This design prints the entire year in 2 pages.
- The 12 months are shown as 6 months in each page and each month as 6 rows X 7 columns.
- The Holidays, Events and Weekends are highlighted on the calendar.
- Holiday Names and Event Names are not listed in this design.
Calendar Design 14
12 Pages – Monthly – with Events
- This design prints the entire year in 12 pages.
- The 12 months are shown as 1 month in each page and each month as 6 rows X 7 columns.
- The Holidays, Events and Weekends are highlighted on the calendar.
- Holiday Names and Event Names are listed for each month in this design.
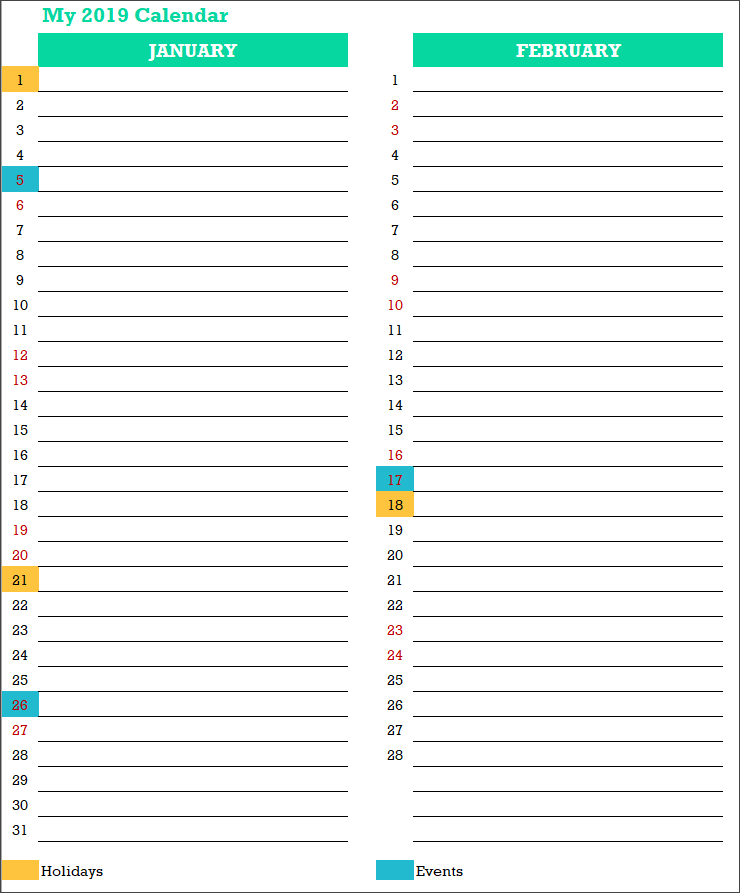
Calendar Design 15
12 Pages – Monthly – Type Events

- This design prints the entire year in 12 pages.
- The 12 months are shown as 1 month in each page and each month as 6 rows X 7 columns.
- The Holidays, Events and Weekends are highlighted on the calendar.
- Holiday Names and Event Names are not listed for each month in this design.
- Type any text just below any date directly on the Calendar.
Calendar Design 16
12 Pages – Picture Calendar
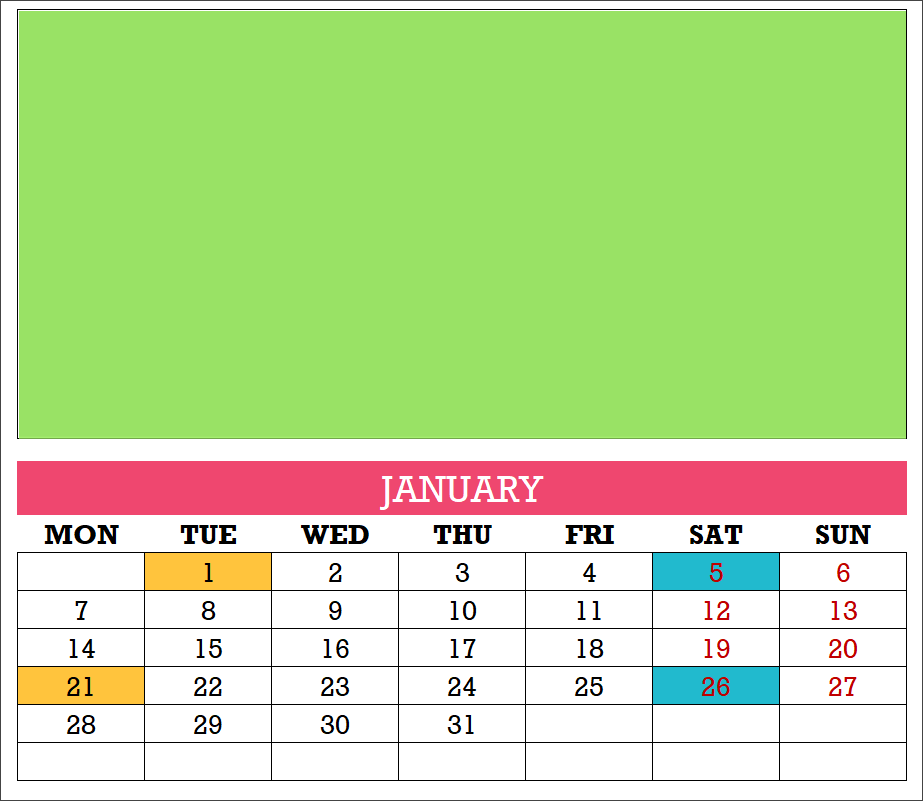
- This design prints the entire year in 12 pages.
- The 12 months are shown as 1 month in each page and each month as 6 rows X 7 columns.
- The Holidays, Events and Weekends are highlighted on the calendar.
- Holiday Names and Event Names are not listed for each month in this design.
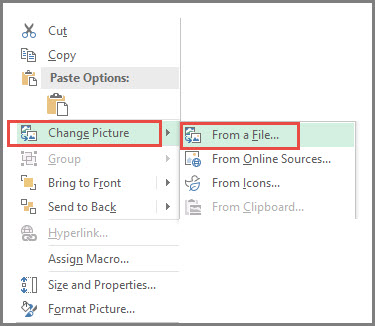
Right Click on image and change picture for each month. Choose from file on computer or online
Calendar Design 17
12 Pages – Quotes Calendar
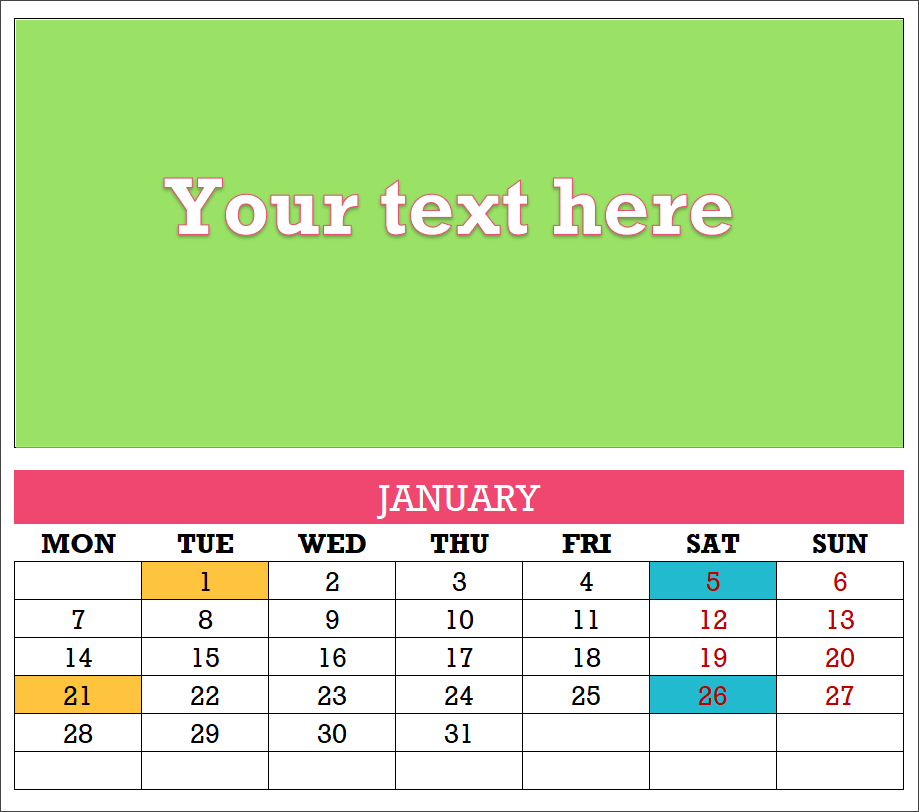
- This design prints the entire year in 12 pages.
- The 12 months are shown as 1 month in each page and each month as 6 rows X 7 columns.
- The Holidays, Events and Weekends are highlighted on the calendar.
- Holiday Names and Event Names are not listed for each month in this design.
Click on placeholder text and type any text for each month. Create your own customized calendar of quotes.
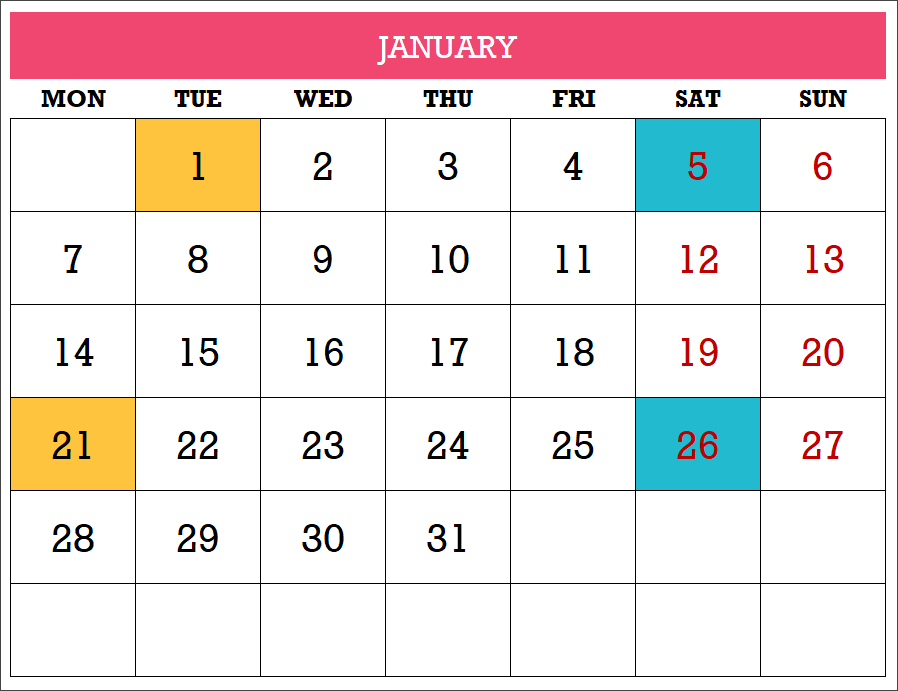
Calendar Design 18
1 Page – Weekly Calendar
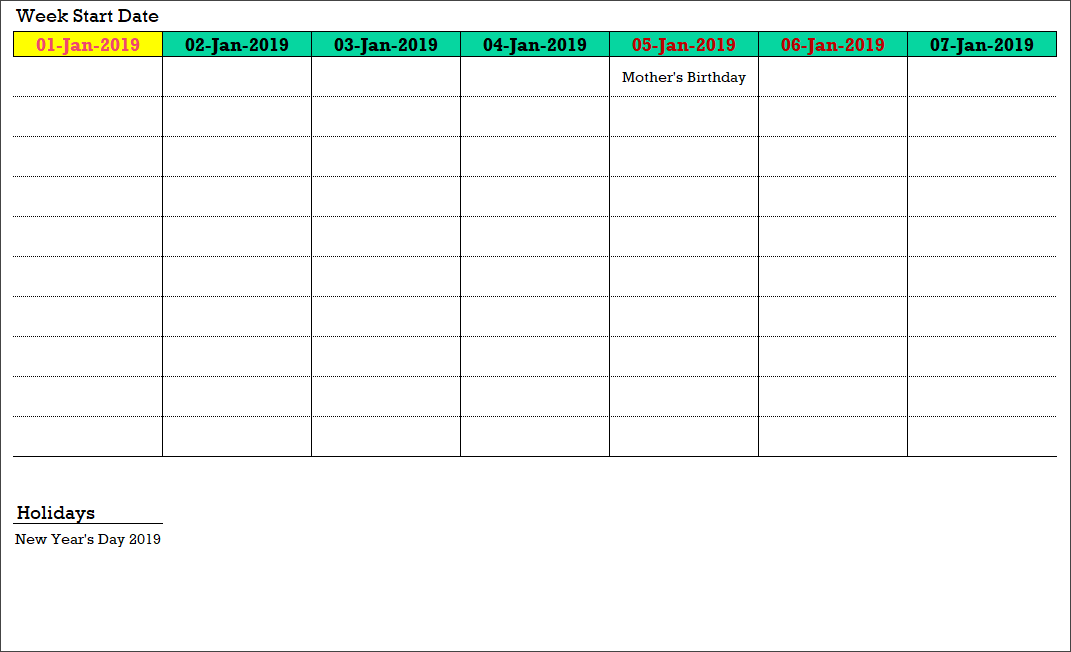
- This design prints one week in 1 page.
- Type the Week start date to generate a weekly calendar for any week.
- Weekends are highlighted on the calendar.
- Holiday Names and Event Names are listed in this design.
- Up to 10 Events per day and up to 5 Holidays per day.
Calendar Design 19 (Daily Calendar)
1 Page – Daily Calendar
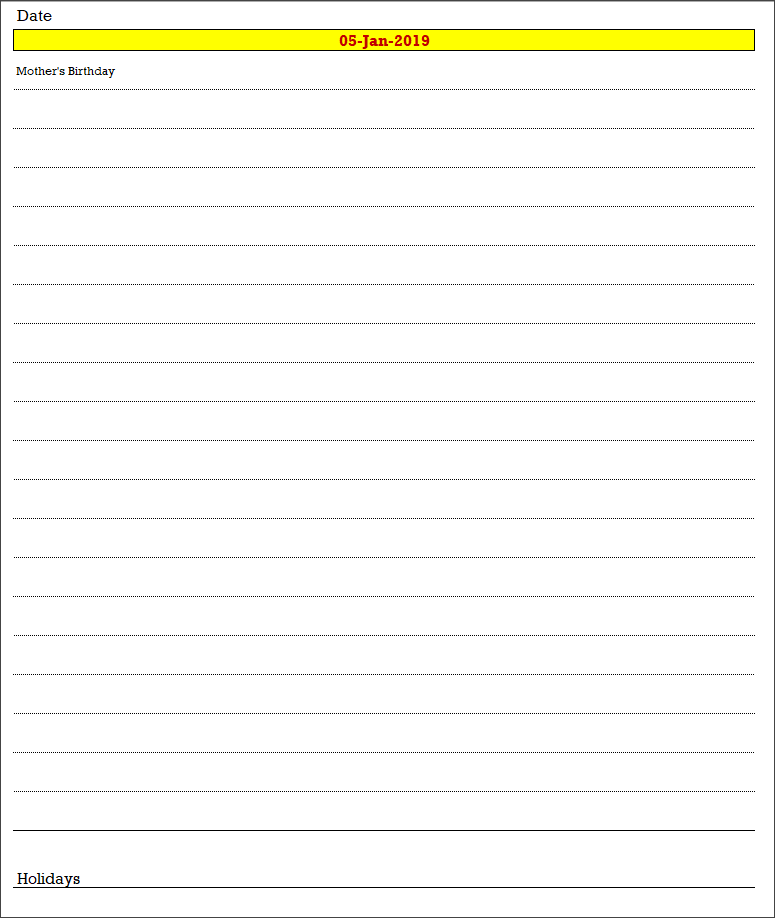
- This design prints one day in 1 page.
- Type the Date to generate a daily calendar for that date.
- Weekends are highlighted on the calendar.
- Holiday Names and Event Names are listed in this design.
- Up to 20 Events per day and up to 5 Holidays per day.
TIPS TO CUSTOMIZE THE 2019 CALENDAR TEMPLATE
1. How to change formatting (colors/fonts/borders)?
One of the common reasons for making changes would be to change the formatting of the calendar. I am sure that you may have your personal favorites when it comes to colors and fonts. The template is designed so that you can make these changes yourself without negatively affecting the functionality of the calendar.
Select Cells to change formatting
For example, in the image above, I have selected the 2 months (January & February).
In the Home ribbon, you will see the Font section (as shown below).
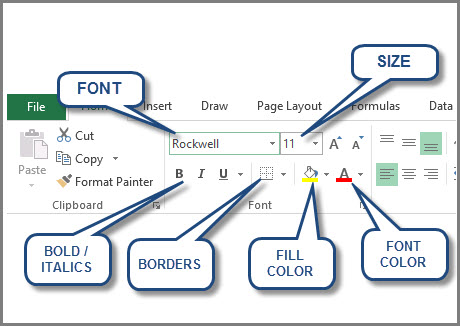
We can change the font, font size, font color, fill color, borders and also apply bold and italics format.
Some of the border options require unprotecting the sheet. We will see how we can unprotect later in this post.
A couple of things to note here:
- If you change the font color, the dates’ color will change except for the Weekends. Weekends are set up to show with red color.
- If you change the fill color, you will notice that the days with Holidays and Events will not change. Holidays and Events are set up separately with their own colors.
I will explain now how both the above points can also be addressed.
2. How to change Event and Holiday colors?
Events and Holidays are colored automatically on the calendar using conditional formatting. As with everything with this template, it’s easy to change them too.
First, click on Conditional Formatting menu in the Home ribbon, and select Manage Rules.
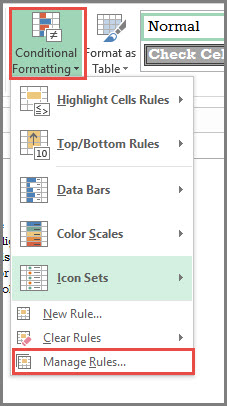
The next dialog box shows the 3 rules we have used in this worksheet. Make sure that you choose ‘This worksheet‘ at the top.
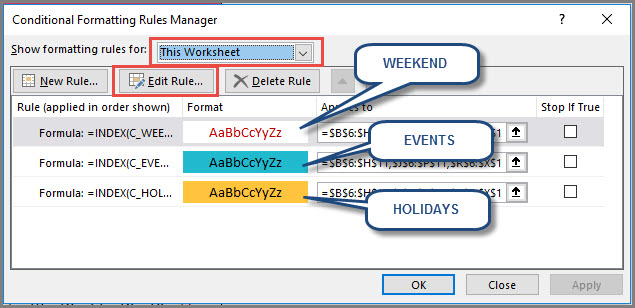
We can modify each of the rules separately. Just click on one of the rules and then click on ‘Edit Rule’ button. In this example, I have clicked on the ‘Events’ rule.
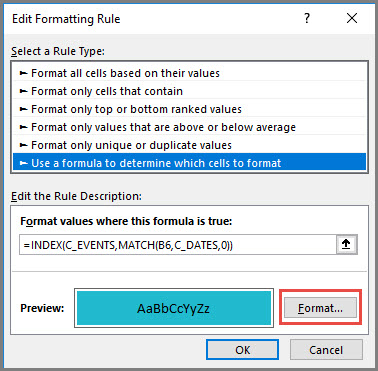
Click on the Format button. It opens the next dialog box.
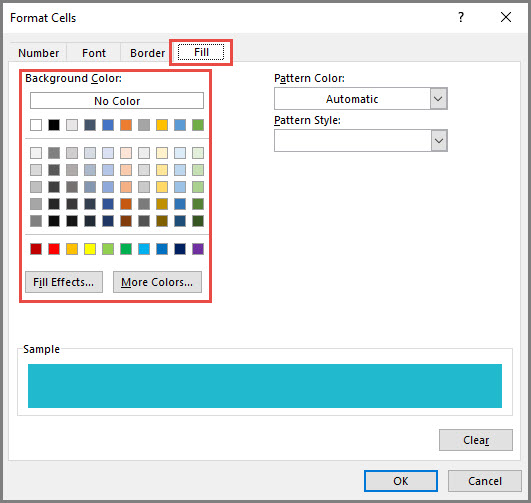
We can modify not just the fill color, but also the Number format, font and border. For this tutorial, I have just highlighted where you can change the background fill color.
You can choose one of the standard colors or click on ‘More Colors‘ button to choose any color from the spectrum.
Click OK to the dialog box and then the following open dialog boxes.
Then, you should see the changes applied to the entire calendar sheet. Save the file to save the changes.
3. How to change the order in which events/holidays appear on calendar?
Some of the calendar designs list the names of events and holidays on the calendar. They are designed to be listed in the same order in which they were entered in the Holidays and Events tables in Settings sheet.
If you had entered them in a random order in the tables, then you can easily sort them. For example, in the Events table, click on the Event Date header label. A menu pops up where you can choose ‘Sort Oldest to Newest‘.
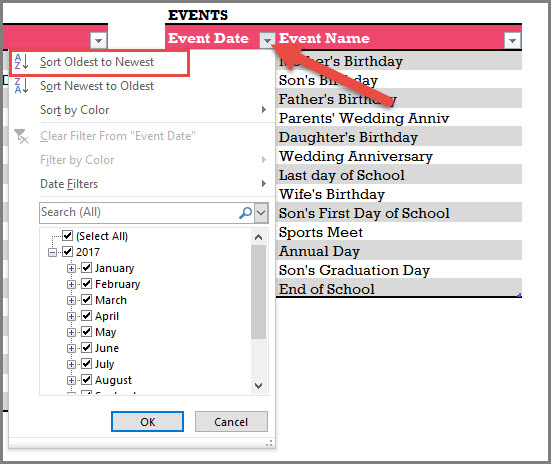
This would sort the Events table with dates in ascending order.
You can apply the same technique to the Holidays table.
4. How to change the date format for events and holidays?
I have used the date format MMM-DD (example: Jan-05) to show the dates. I usually try to show the month in text instead of numbers as I understand that there are differences in formats used by different countries. 1/10 could be interpreted as Jan 10th or Oct 1st, depending on which country you live in.
However, you can easily change it to any format to suit your needs.
Just select the cells where you want to apply the change.
Then, press Ctrl+1 to open the Format cells dialog box.
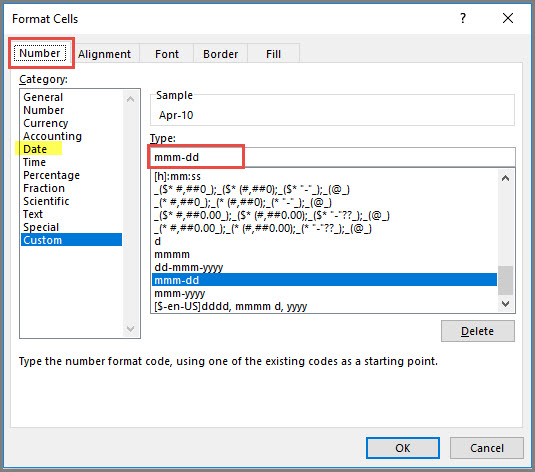
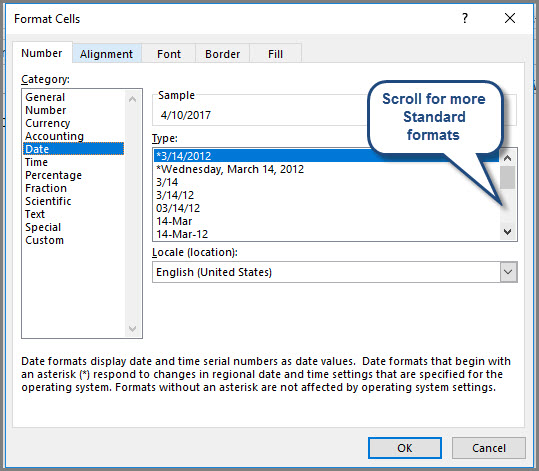
You can type your own custom format or click on ‘Date’ in the list on the left. Then, you can choose from the standard date formats.
5. How to unprotect (unlock) sheets?
All the customization mentioned above can be made without unprotecting any sheets.
If you plan to make more modifications and you see that you are not able to, you can unprotect using indzara as password.
For more details, please see my article on how to unprotect sheets.
Please remember to protect the sheets again in order to prevent accidental editing of formulas.
6. How to print calendars?
To print, press Ctrl+P or find the Print option in the File menu.
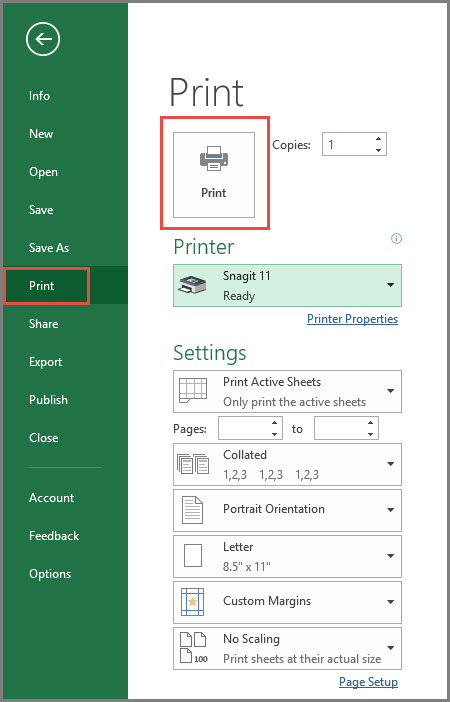
Since the template is already pre-set for printing calendars, you can quickly review the calendar in preview and then click on Print to print.
If you need to print only a subset of pages, please enter page number range.
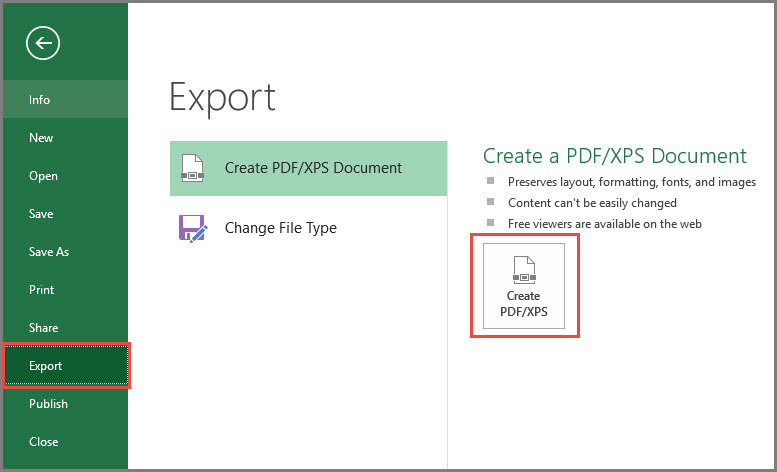
7. How to export calendar to PDF?
To export to PDF, choose Export in the File menu and then click on Create PDF/XPS.
In the following dialog box,
- Choose the place in your computer to store the PDF.
- Give a meaningful name to the PDF
- If you need to control which pages are being exported to PDF, click on Options. Choose specific page numbers you want to export and click OK.
- Click Publish to publish PDF.
RECOMMENDED TEMPLATE
Event Calendar Maker

Additional Features in Event Calendar Maker
- 12 Frequency Types (automatically generate recurring events)
- Categorize events into 12 Event Types
- Choose from 15 Colors to highlight
- 7 Calendar Designs (2 Yearly, 3 Monthly, Weekly and Daily calendars)
- Works for any year
- 300 events and 1200 instances
- Control which events you would like to display by deactivating events
- Control order of priority of events
- Switch Off Non-business days easily
If you find the template useful, please share with your friends. Please leave a comment below to let me know your feedback. Thank you.
Have a wonderful 2019.