
In this article, we will explain step by step how to use the Retention Dashboard Excel Template. To learn more about the features of the template and to download, please visit the Product page.
OVERVIEW OF STEPS
- Enter data in Employees Data sheet
- Refresh Calculations
- View/Interact with 3 Dashboards
VIDEO DEMO
STEP 1: ENTER DATA IN EMPLOYEES DATA SHEET
All the input happens in one sheet. This is a table with default 1000 rows.
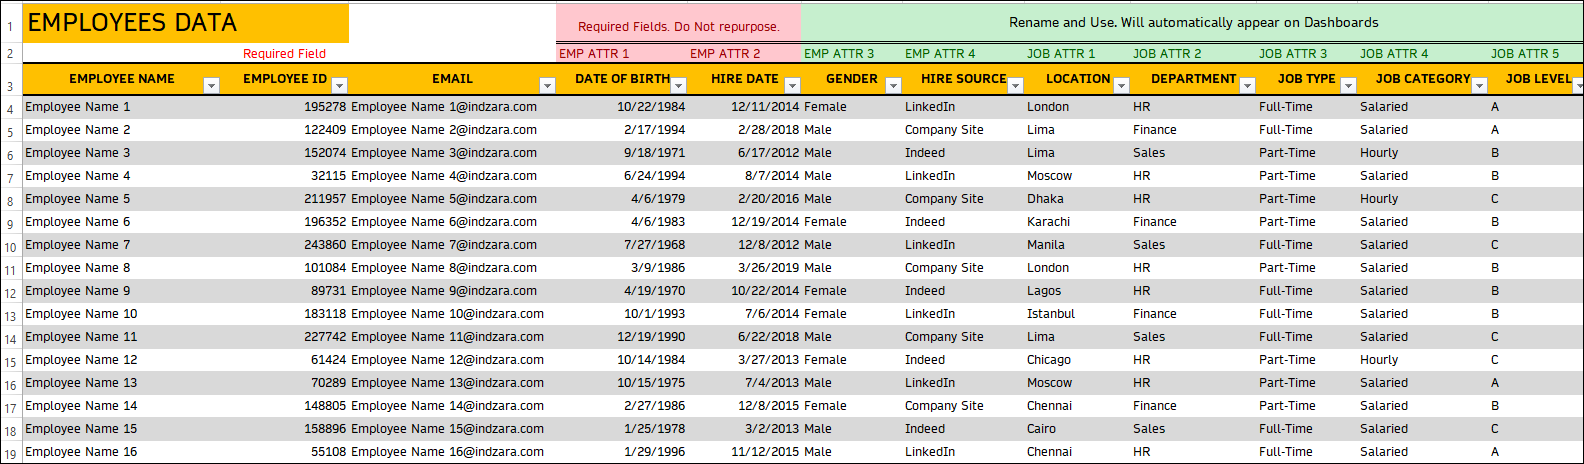
Each row in this table represents one employee’s record.
Start by entering Employee Name, Employee ID and Email information.
Employee ID is a required field.
You can rename EMAIL field and use it to store any other information as needed.
Now, let’s look at 14 other columns in this table. We can categorize them into 3 categories of attributes.
Types of Attributes
4 Employee Attributes – Date of Birth, Hire Date, Gender, Hire Source
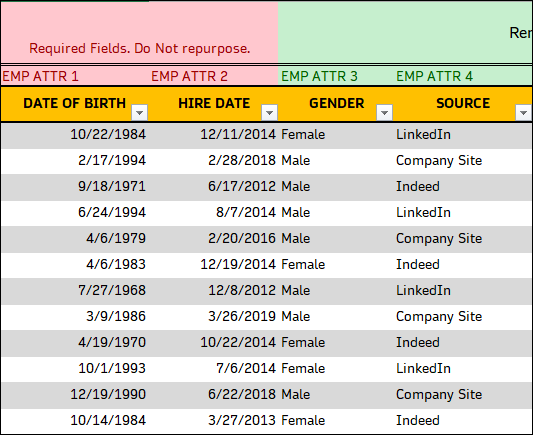
- These attributes are typically those that do not change over time for an employee
- Hire Date and Date of Birth columns should not be repurposed. They are used for calculating Employee Tenure and Age. Modifying this will break the calculations.
- Gender and Hire source can be renamed and repurposed. Repurposed means the column can be used to store other information. For example, you can rename Hire Source as ‘Salary Method’ and note values on how the employee gets paid (Check/Cash/Direct Deposit). They will still flow through to the dashboards and be displayed as expected.
7 Job Attributes – Location, Department, Job Type, Job Category, Job Level, Job Title, Salary
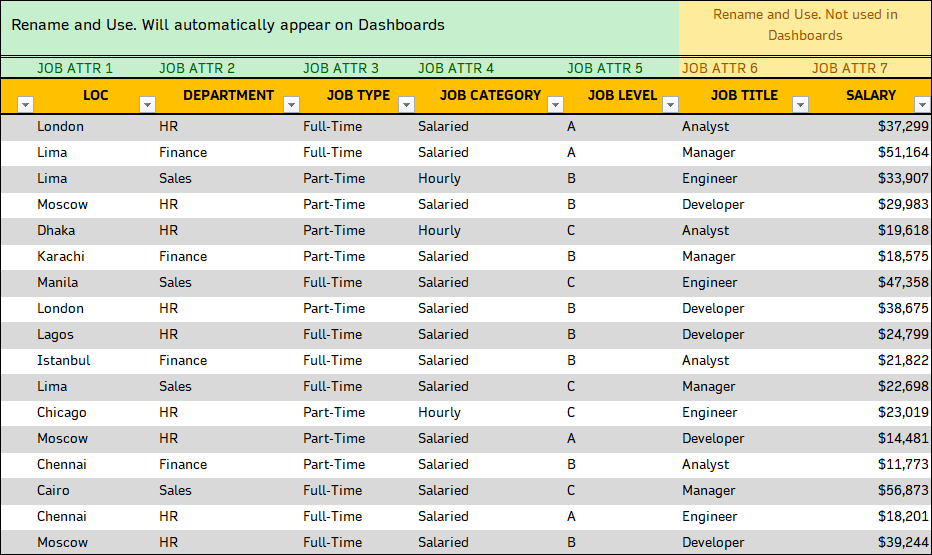
- These are attributes that can be updated over time for an employee. For example, an employee can move from one Department to another.
- 5 are set up to automatically appear on Dashboards.
- 2 (Job Title and Salary) are available to store data in the table, but do not flow through to the dashboards.
- All 7 attributes can be customized. They can be renamed and repurposed.
3 Exit Attributes – Exit Date, Exit Type, Exit Reason
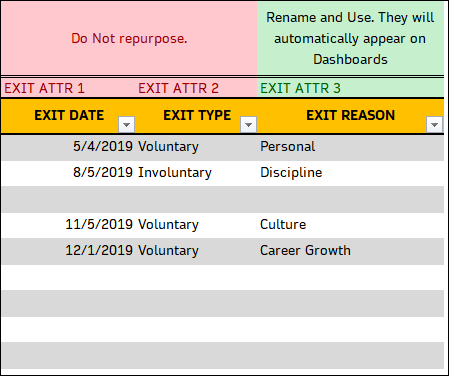
- These attributes are required to be entered only for employees who have left the company. They can be left blank for active employees.
- Exit Date and Exit Type cannot be repurposed as calculations are based on those two columns.
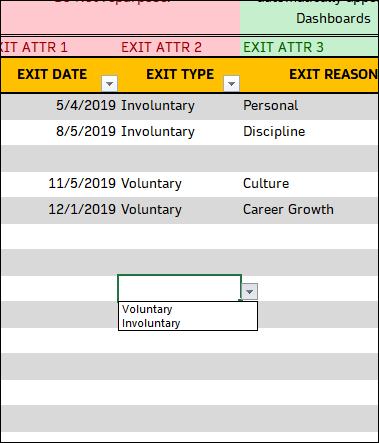
- Exit Type requires Voluntary and Involuntary as values.
- Also called as Termination Type in some companies.
- Exit Reason can be repurposed. It will appear on Exit Dashboard automatically.
- Also called as Termination reasons in some companies.
In General values are not limited in any column except Exit Type column.
When to enter what data?
- To begin: When you first start using the template, you will enter all existing employees in your organization.
- After that, when new employees join, you will enter that new employee’s information in the table.
- When employees move from one department to another or from one location to another, you can just update the specific employee’s data in the table.
- When employees leave the company, enter the Exit Attributes for those employees.
How to rename and use customizable fields
In the Employees Data sheet, just click on the column header and rename it.
How to add more attributes
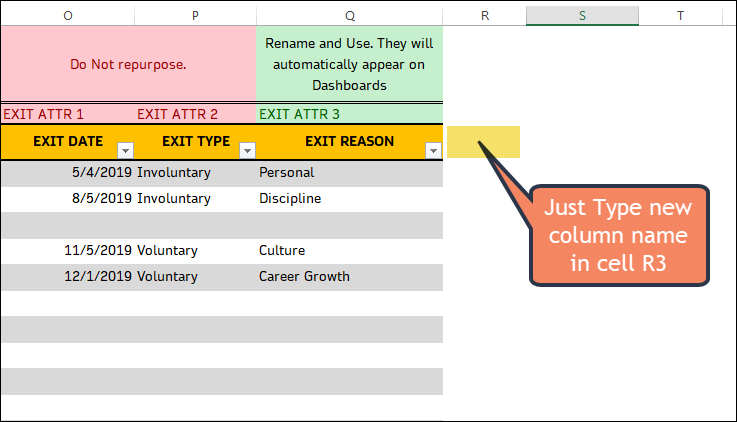
You can click on cell R3 and type a new column name. This will add a new column. You can add any number of such columns to track information about employees.
Note: new columns will not appear on dashboards automatically.
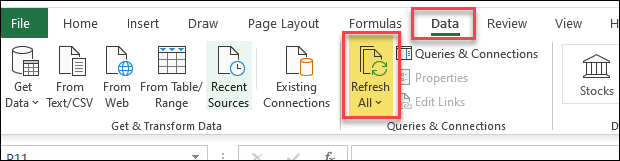
Step 2: REFRESH CALCULATIONS
The template uses pivot tables and hence the calculations have to be refreshed every time data is added or edited in the Employees Data sheet.
From the DATA ribbon, click on Refresh All.
STEP 3: DASHBOARDS
Once the data is entered and refreshed, we can view the 3 dashboards.
The template provides three automated dashboards:
Retention Dashboard
Retention Dashboard presenting 7 KPIs with trend over the last 12 months.
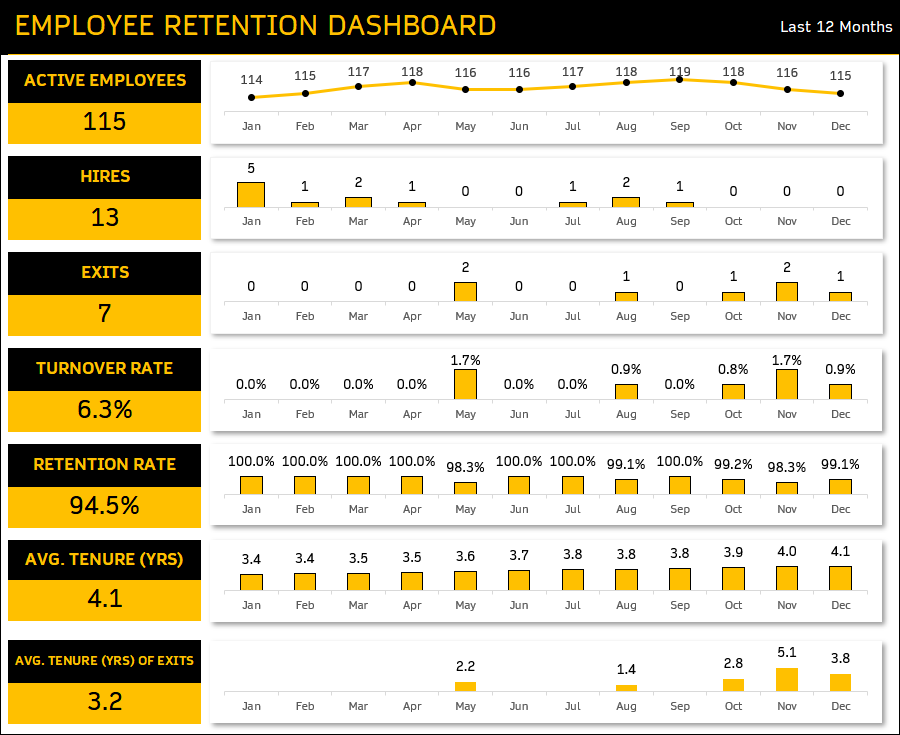
7 KPIs
Following 7 KPIs are automatically calculated by the template
- Active Employees: Number of employees active with the company
- Hires: Number of new employees hired
- Exits: Number of employees who have left the company
- Turnover Rate: (Number of Exits/Avg. Number of active Employees during the period) * 100
- Retention Rate: (Number of Exits from Employees active at the Beginning of the period /Number of Employees active at the beginning of the period) * 100
- Tenure of employees: Average duration of employment of active employees
- Tenure of Exit Employees: Average duration of employment at the time of exit
Snapshot Dashboard
Snapshot Dashboard provides interactive view of # of Employees and Avg. Tenure by 7 different employee and job attributes.
Page 1 shows the number of employees and breakdown by various attributes.

Page 2 shows the Average Tenure of employees and breakdown by various attributes.
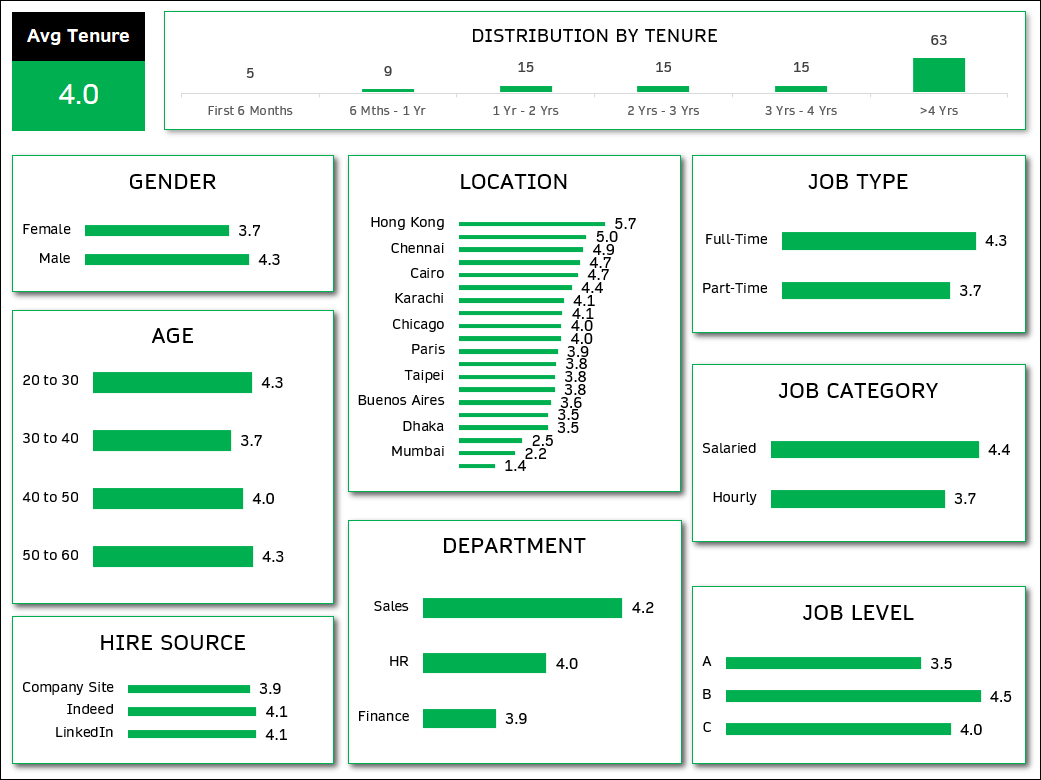
There are 10 Slicers available to drill down.
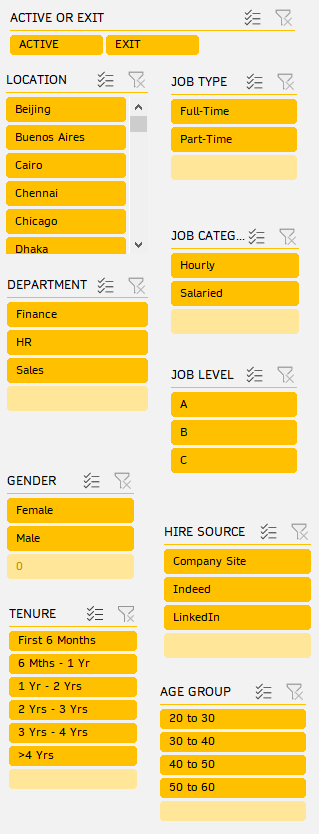
To select multiple values in a slicer (for example, Hire Source LinkedIn and Indeed) just press Control while clicking on the specific values.
Exit Dashboard
Exit Dashboard provides interactive view of exit data. Exit Type (Voluntary/Involuntary) and Exit Reason can be quickly viewed to understand how, why and when employees are leaving the company.
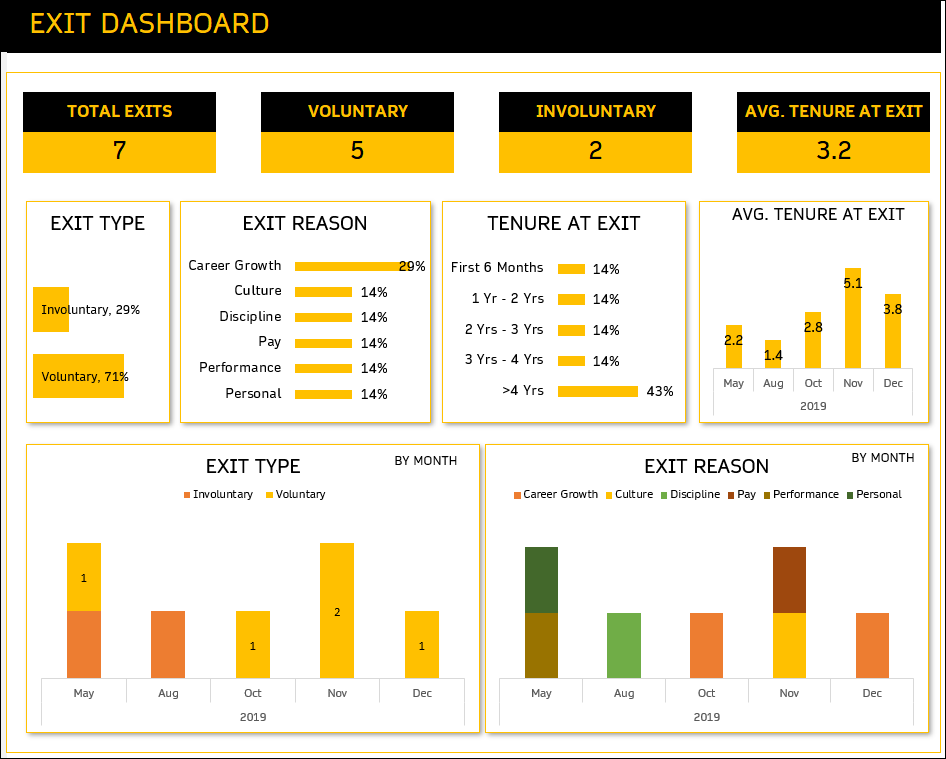
12 slicers are available to drill down or filter.
This dashboard represents only employees who left the company.
Modifying Dashboards
- Charts: If you do not need one of the charts in the Dashboard, just remove that one chart by selecting and deleting, without impacting the rest of the dashboard.
- Slicers: If you do not need one of the slicers in the Dashboard, just remove that one slicer by selecting and deleting, without impacting the rest of the dashboard.
- Renaming Slicers: You can rename the slicers by changing the settings of the slicer.
- Right click on a slicer and choose ‘Slicer Settings’
-
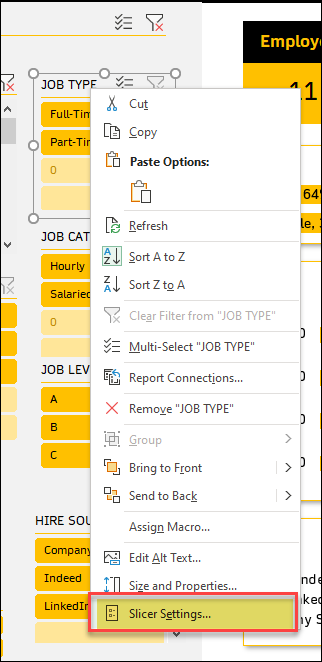
Modifying Slicer Settings Rename the Caption
-
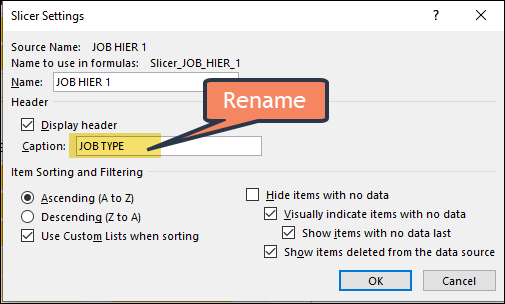
Renaming Slicer
-
- Resizing Charts: Depending on the data in your organization, you may need certain charts and slicers to be long or short. Not a problem. Just unprotect the sheet and resize the chart to fit your needs. It will not impact the dashboards in any negative way.
How to Print or Export to PDF
The Dashboards are set up to be ready for print. Press Control+P or use Excel’s file menu to print. You can also use Excel’s default Export to PDF option and export as PDF.
Unprotecting Sheets
You would not need a password to use the template. The template performs the default functionality without having the need to unprotect protected sheets. However, if you would like to modify functionality, you can use indzara as password to unprotect and then make changes.
Whenever you unprotect the sheet, please protect it after making the adjustments.
Extending beyond 1000 employee limit
The template has a hidden sheet named HELP which is limited to 1000 rows. That table needs to be extended down to more rows. Then, automatically the dashboards will pick up more than 1000 rows entered in the Employees Data sheet.
If there are any questions on this template, please post in the comments section below.