How to add tiers to the Tenure table in PTO Manager
[vc_row][vc_column][vc_column_text]In this blog post, we will discuss the simple 4 step process to add tenure tiers to the Small Business PTO Manager Excel Template.
Small Business PTO Manager Template is a solution to manage employees’ PTO data in Small Businesses
In the PTO Manager template, we can set the PTO accrual to be based on a tenure table.
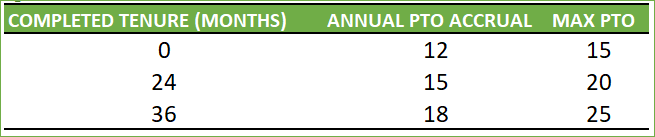
For example, employees start with 12 days of annual PTO accrual, and once they complete 24 months of employment (tenure), then they start earning 15 days of PTO every year. We implement this using the tenure table where the user can enter their choice of tenure months, PTO accrual and Max PTO, according to their company’s PTO/Leave policy.
By default, the table has 3 rows and the sheet is locked. In some companies, there could be more than 3 tenure tiers. Let’s see how we can add more rows to this table in the simple 4 step process.
Why we lock the spreadsheets
In some of our templates, we protect (or lock) the sheets using a password. This is done to prevent the user from accidentally editing/removing the formulas used. We also give the password to the customer so that they can unprotect and edit if they are familiar with Excel and formulas.
Auto-Expanding Excel Tables
If you are completely new to Excel tables, please visit our Introduction to Excel tables. Excel tables have a default feature by which if we enter data in the row immediately following the last row of the table, it will auto-expand and include the new row as part of the table. This is one of the breakthrough features that almost all the templates from indzara.com depend on. There is a catch though. This feature does not work if the sheet is protected.
VIDEO DEMO
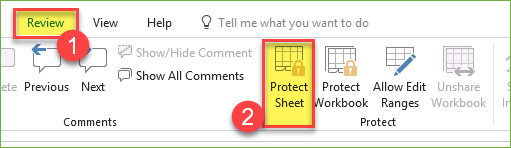
Step 1: Unprotect or unlock the sheet
Navigate to the Review ribbon and click on Unprotect Sheet.
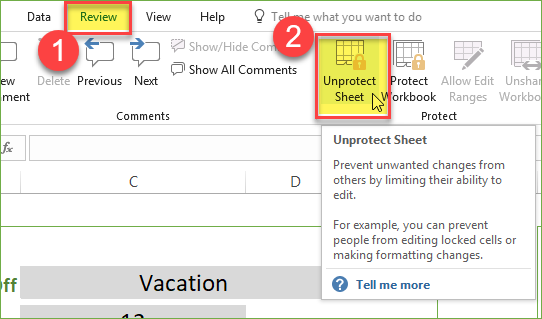
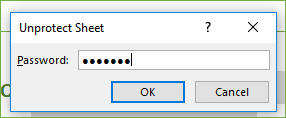
A dialog box pops up where you can enter the password indzara and click OK.
Step 2: Enter data to add to the table
Now that the sheet is unprotected, we can add rows to the table.
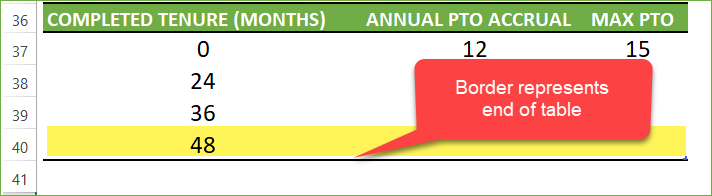
To add one row, type the data in the row immediately following the last row of the table. Here, we will type the number in cell B40 (last row of the table is 39) and press Enter key.
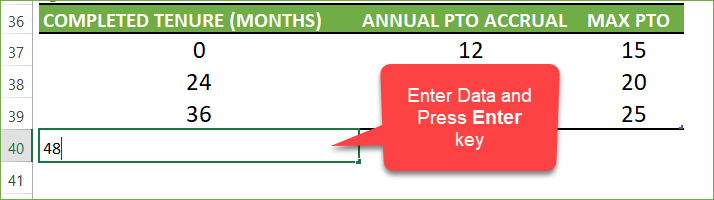
After pressing the Enter key, the table will expand to include row 40. You can confirm this by seeing the border line now move to row 40.
To add one more row we can enter data in row 41 and press Enter key. As simple as that.
Step 3: Protect the sheet
Once we have entered as many rows as possible, we can protect the sheet again to prevent accidental modification of formulas.
In the Review ribbon, choose Protect Sheet option.
Enter a password and then click OK. There is no need to change any of the other options.
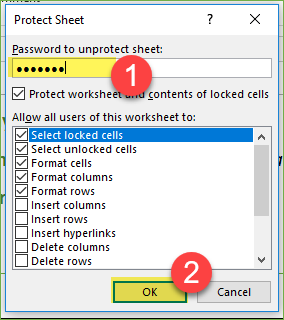
Now you have protected the sheet again.
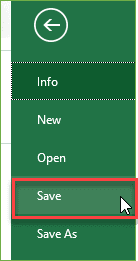
Step 4: Save the changes
After protecting the sheet, please save the changes to the file. Otherwise, the changes you made will not be saved.
Press Ctrl+S or use the File Menu.
If there are any questions about this article, please post them in the Comments below.[/vc_column_text][/vc_column][/vc_row]
2 Comments
Nice job explaining the way to add a line to the table. Made it really easy to understand.
Thanks