2025 PTO Balance Calculator (Hourly) – Free Google Sheet Template
A Simple Google Sheet template to help you to track the PTO (paid time off) balances of hourly employees.
Download this free Google Sheet template to track and calculate Employee’s PTO accrual balances based on hours worked by the employee.
If you need a PTO Calculator that calculates accrual based on employee tenure, please see PTO Calculator (Salaried Employees)
If you are familiar with PTO calculation, you would be aware that though it appears to be simple from the outside, accounting for various scenarios and PTO policies make such calculation complex and not easy to implement.
For more details on key components of a PTO policy and how to calculate PTO balances, please read PTO Policy Factors and Balance Calculation
This Google Sheet Template is designed in such a way that you can enter the inputs of the PTO policy and are ready to track PTO balance automatically within a few minutes.
This template is designed for Google sheets, but if you are looking for an Excel template, please visit the PTO (Paid Time Off) Balance Calculator for Hourly Employee in Excel
In this article, we will cover the following topics.
- Overview of how to use the template
- Detailed Step by Step user guide on how to track PTO for your hourly employee
Benefits of the Google Sheet
- Options available covers most common business PTO policy scenarios
- Very flexible and easy to customize for your specific business needs
- Automatically calculates current PTO balance and projected future balance
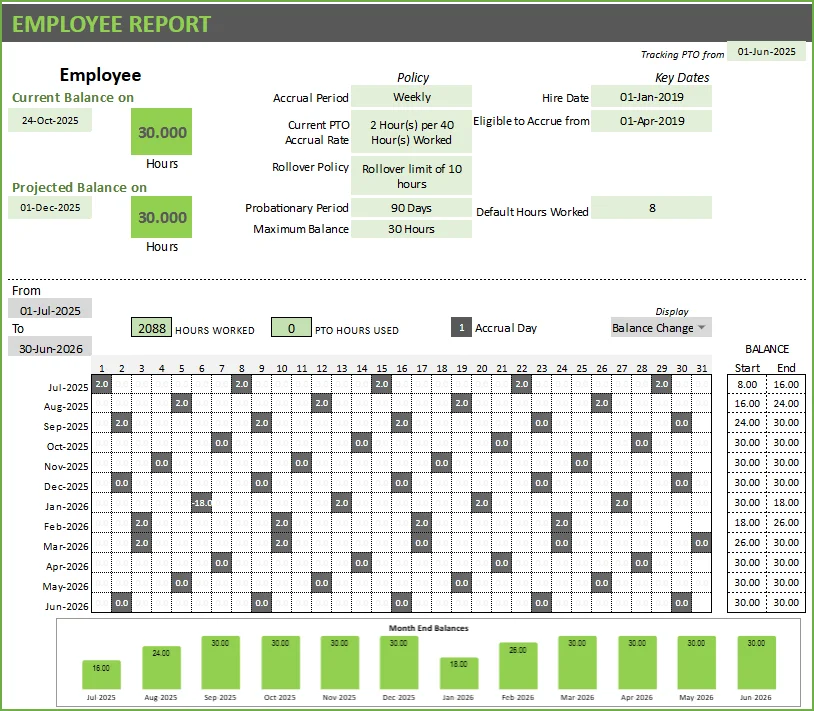
- Interactive and printable PTO Report showing all details in a simple calendar view
- Supports tenure-based accrual rate tiers
- File is designed for one employee only. Make a copy of workbook to use for second employee.
- Tracks PTO balance for at least 2 years (and can be reset in new file and extended).
Free Google Sheets
How to calculate PTO in Google Sheets for Hourly Employees?
- Make a copy of the Template
- Enter the Input Data
- View Balances in PTO Report
Step 1: Make a copy of the Template
Click on the link above and then make a copy of the sheet as shown in the screenshot below.
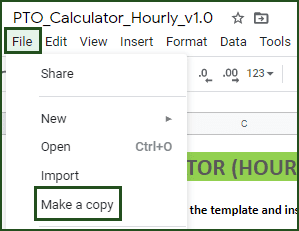
You can save the copy in your own google drive for your use. You can then share the copy with your colleagues to collaborate as needed.
Step 2: Enter the Input Data
- Enter employee details and PTO policy inputs in the PTO POLICY SETTINGS sheet
- Review first set of accrual days to ensure information is correct. Ensure there are no errors in the data entry validation.
- Enter your company’s Weekends and Holidays in WEEKENDS HOLIDAYS Sheet
- When employee works different hours (more or less) than the default daily hours, enter them in the HOURS WORKED sheet
- When employee takes PTO, enter PTO info in the PTO USED sheet
Enter Details in the Settings Sheet:

STARTING DATE
Enter the date from which you would like to use this template to track PTO. There are two key purposes for this date. 1) The template will only calculate PTO from this date. 2) The Starting Balance (which we will discuss soon) will be the balance at the end of the day before this Starting Date.
Employee Details
EMPLOYEE NAME
Enter name of employee for whom we will be tracking and calculating PTO balance. This will automatically then appear in the PTO Report.
HIRE DATE
Enter the date when employee joined the company. Even if you have been tracking PTO using some other tool and now want to switch to use this template, enter the actual hire date of the employee. I will soon explain how you can carry over balance from your previous tool.
STARTING BALANCE
Here, we can enter balance we carry over for employees whom you have been tracking PTO from other tool before you switch to using this template.
For example, if the employee started working in 2017, but you started to switch to this template on July 3, 2019, then you can enter the starting balance as of end of July 2, 2019. Any PTO used from July 3, 2019 will have to be entered in the template.
DEFAULT HOURS WORKED
This is to record how many hours this employee works every working day. This option is given to reduce data entry. Let’s say the employee works usually 8 hours a day but occasionally he/she may work less or more than 8 hours. You can enter 8 as default working hours. On all days except holidays and weekends, the template will assign the default hours worked by employee.
You can then enter adjustments for specific dates when the employee did not work 8 hours.
Instead of entering the actual hours every day, the template allows setting the default hours once and then only entering work hours when it deviates from the default. Less data entry. Simple and Effective.
If your employee has varying hours daily, then you can enter 0 hours as default and choose to enter actual hours for every day (I will show where to enter that information in the upcoming steps below).
That’s how flexible the template is. You can make it work to suit your business requirements.
Now, let’s get into the PTO Policy. Fun Stuff!
Here is a sample policy.
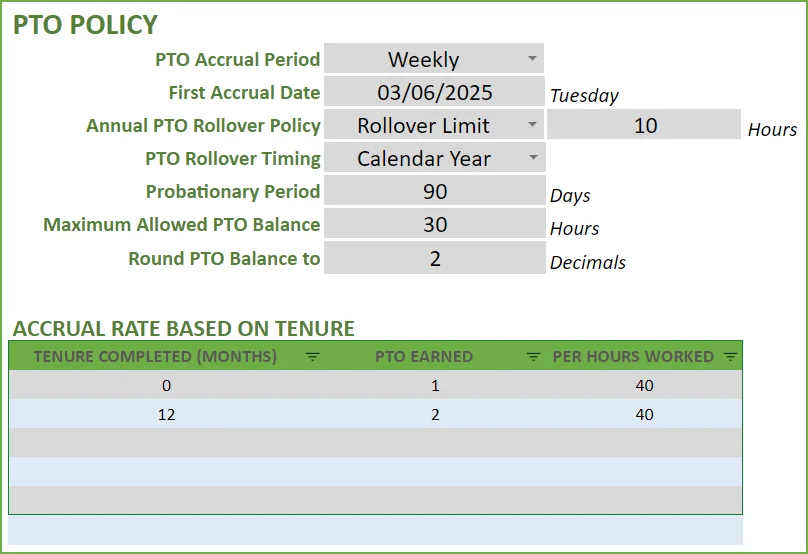
There are several components of a PTO policy. We will go through one by one.
PTO ACCRUAL PERIOD
This is to inform how we often accrue the PTO. We have 4 options here: Weekly, Every 2 Weeks, Twice a Month and Monthly.
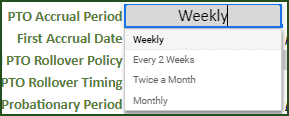
Weekly
This option means that employee can accrue PTO balance once a week, provided he/she has worked enough hours (cumulatively) to meet the Accrual rate policy.

In the above screenshot, you can see that a new input (First Accrual Date) becomes necessary for weekly policy. Since a weekly accrual can happen on Fridays in some companies and Mondays in some companies, we provide the option to enter a specific date when the first accrual should happen. Here, we entered 5th July 2019 – which is a Friday.
So, the template will set accruals every Friday beginning on 5th July 2019. 5th July, 12th July, 19th July…..
Every 2 Weeks
Entering an Every 2 Weeks policy is similar to weekly. The template, in this case, will only set accruals every 2 weeks.

If the first accrual date is 5th July 2019, the template will automatically set up accruals every other Friday – 5th July, 19th July, 2nd Aug, 16th Aug…..
Twice a Month
Now, let’s move to Twice a Month option. Here, we can enter the two dates of the month the accrual will happen.

For example, in the screenshot above, we have chosen 1st and 15th of every month.
You have control over the specific 2 days of the month. The template even supports ‘Last Day’ option.

For example, the above scenario will set up accrual on 15th of every month and Last Day of every month. If the month has 28 days or 29 days or 30 days or 31 days, the template will automatically figure out the last day and set up accrual for that day.
Monthly
I am sure that by now, you see the pattern here. For monthly, we can set the day of month that we want accrual to happen every month.

For example, as shown above, we can do accruals on 1st of every month.
Instead of 1st, you can type in any day of the month. You can also choose ‘Last Day’ of month.

REVIEW FIRST ACCRUAL
We need to check and ensure that the data provided in the inputs are correct and result in a valid accrual policy. The template shows the first set of accrual dates.
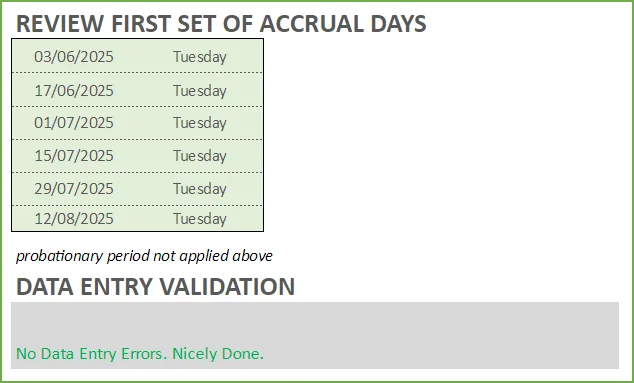
In the above screenshot, there are no errors. The accrual dates are weekly from 5th July. (Probationary period setting is not considered in this list of dates and the dates shown will include dates in any probationary period you may have set).
The template has in-built data validations to identify if the inputs do not align.
For Weekly and Every 2 Weeks options, First Accrual Date should be within 1 or 2 weeks from the Starting Date. Otherwise, you will see an error message like this one.

In these cases, update the First Accrual Date input to ensure that it is correct.
Now let’s discuss Rollover Policy.
ANNUAL PTO ROLLOVER POLICY
The template provides three options.

- Zero Rollover: Employee loses all the PTO balance at the end of the year and starts from scratch in the next year.
- Rollover Limit: We can set a limit on how many hours are carried over.
- Unlimited Rollover: Here the employee does not lose any PTO and will carry over everything to next year.
With rollover policies, there is another variation. Some companies may apply rollover at calendar year change 1st Jan of every year or on work anniversary dates (which vary for each employee). You can easily change that setting.

PROBATIONARY PERIOD
Enter the duration of the Probationary period in days.

For example, in the screenshot above, employee does not earn any PTO during the first 90 days of employment.
MAXIMUM ALLOWED PTO BALANCE
You can set a limit on maximum balance at any time, to ensure that there is a limit to PTO accrual. You can set the amount (hours)in the Maximum Allowed PTO Balance field.
ROUNDING IN PTO BALANCE
When the template calculates balances and display in the report, you can control the precision by just entering the number of decimals.
PTO ACCRUAL RATE
This defines how much PTO hours are earned by the employee for hours worked.

For example, in the above screenshot, the employee would earn 1 hour of PTO for every 40 hours worked.
Since the tenure completed is 0 and we have only tier, the policy will apply to all employees regardless of tenure.
There should always be a record with 0 tenure completed
- If the employee worked 39 hours, he/she would not earn any PTO. But once the 40th hour is completed, he/she will earn 1 hour of PTO.
- The 40 hours do not have to be in the same week or month.
If in your company, the employee would earn 4 hours of PTO for every 160 hours worked, then you would enter 4 and 160 in the corresponding cells.

In this scenario, for the first 159 hours, the employee does not earn anything. But once the 160th hour of work is completed, then it accrues 4 hours of PTO. Essentially, the employee accrues in multiples of 4 hours.
You can also have a tiered structure where you reward loyal employees with higher PTO accrual rate.

In the above screenshot, employees with less than 12 months tenure will earn 1 PTO hour per 40 hours worked. Employees between 12 to 24 months tenure will earn 2 PTO hours for same 40 hours worked, while employees above 24 months tenure will earn 3 PTO hours per 40 hours worked.
WEEKENDS & HOLIDAYS
Now, we are ready to enter the company weekends and holidays.

Choose TRUE for days that are considered weekends in your company.
For example, in the above screenshot, we have set Saturday and Sunday to be weekends. Hence the employee will not by default work any hours during those days. Also, if an employee takes PTO that spans across weekends, the weekend days will not be counted as PTO taken and thus not reduce the PTO balance.
Holidays work similarly, except here you must enter each holiday individually. This is done in the HOLIDAYS sheet.
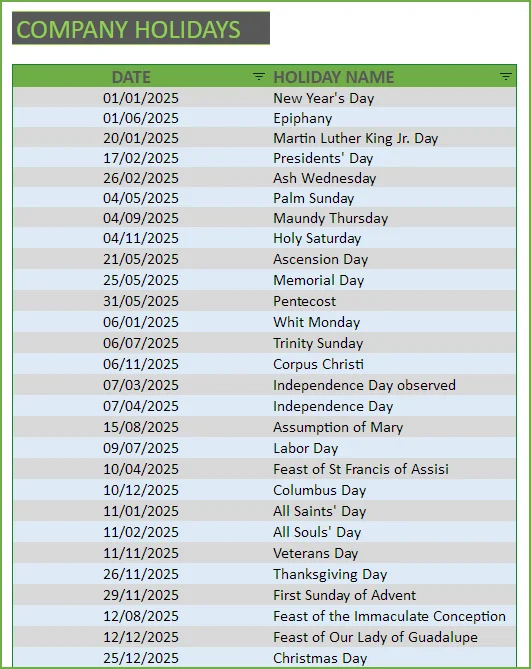
For example, in the below screenshot, we have set Saturday and Sunday to be weekends. Hence the employee will not by default work any hours during those days. Also, if an employee takes PTO that spans across weekends, the weekend days will not be counted as PTO taken and thus not reduce the PTO balance.
Now we have gone through the various PTO policy input options in the PTO calculator. These settings have to be entered only once for an employee.
Enter Hours Worked
In this template entering data on hours worked is simple, as we have already set default hours worked initially. On days when employee worked hours different than the default, then we enter them in the HOURS WORKED sheet.
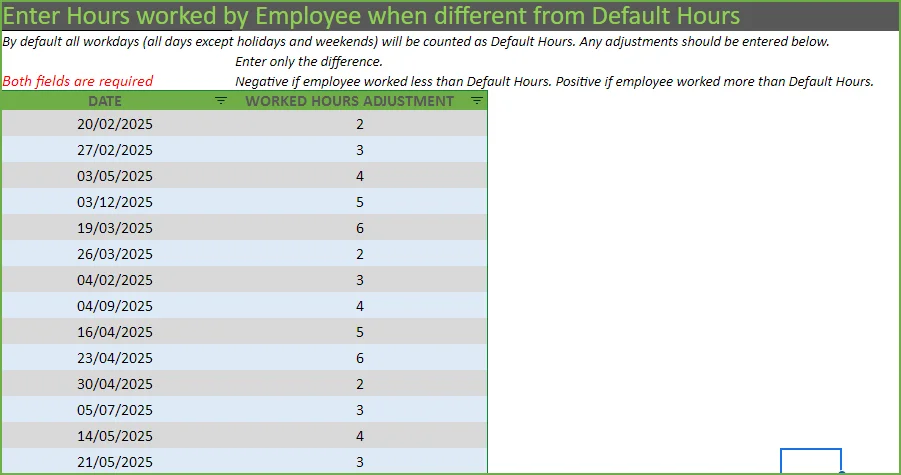
It is important to note that you should only enter the adjustment.
For example, if the default hours worked is 8 and if you enter an adjustment of -8, that means the employee worked 0 hours on that day.
If the adjustment is 1, then the employee worked 9 hours on that day.
Enter PTO Used
When an employee takes PTO or plans to take PTO, you can enter that in the PTO USED sheet.
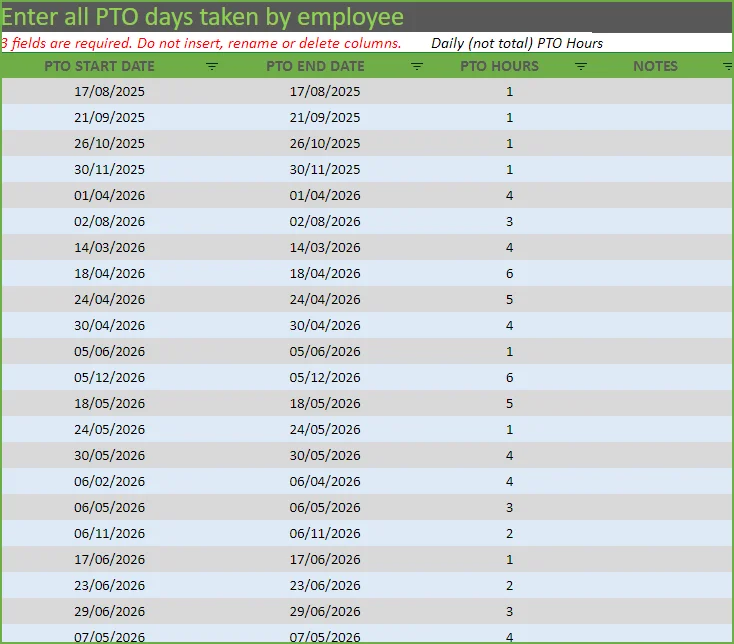
We can enter date ranges to enter multi-day vacation. Even if it is a single day vacation, please enter both start and date as the same date. All 3 fields (PTO START DATE, PTO END DATE, PTO HOURS) are required entries here.
Multi-day Vacations
It is important to note here that the PTO Hours you enter is the daily value not total for multiple days.
In the above example, 1 hour of PTO for each of the 2 days (May 7th, May 8th) – in total 2 hours – will be subtracted from the PTO balance, assuming those dates are not Weekends and Holidays in your company. However, you should enter 1 and not 2 in PTO Hours column.
Step 3: View Balances in PTO Report
PTO Report

Let’s take the report in two sections. The top section shows the summary.

BALANCES
By default, the report shows today’s PTO balance for the employee. The Projected Balance on a future date can also be shown. You can modify the date and can view PTO balance at any date. That will consider future data (work hours, PTO used, holidays and weekends).
POLICY DETAILS
Policy Details along with key dates are shown so that when you print the report, the policy details are also clearly visible.
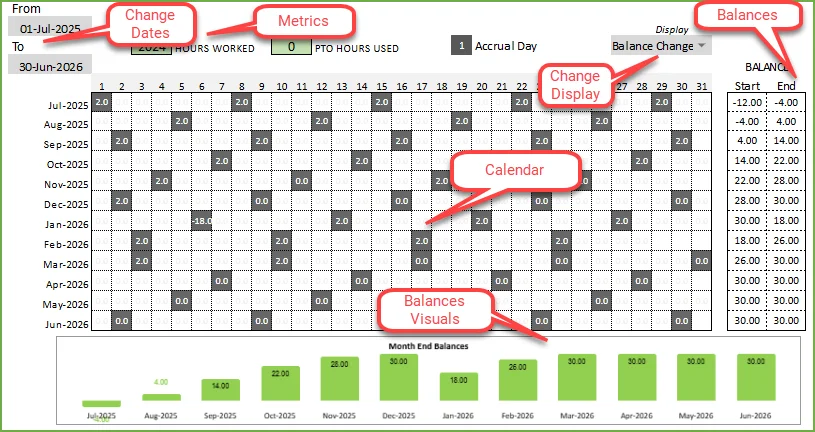
The bottom section provides an interactive calendar.
DATES
The Calendar (12 month) view is to show specific details on each date for a period you choose. You can enter the FROM and TO dates. The calendar will then display information for that specific period.
DISPLAY
The display inside the calendar shows the values for each date and you can control what is displayed.
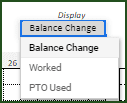
You can display Worked (Number of Hours worked by employee on the day) or Balance Change (PTO Balance Accrued on the day) or PTO Used (PTO used by employee on the day).
WORKED
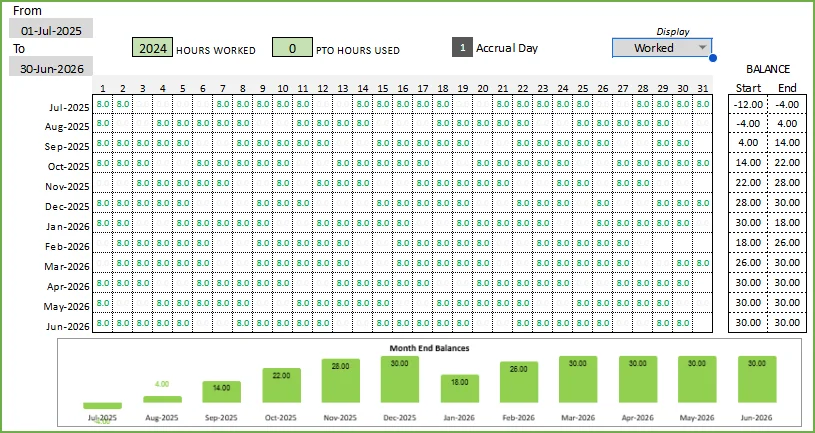
You can view the number of hours worked by employee on each day. This will include any work hours adjustments you entered.
BALANCE CHANGE
This shows the accrual days and the amount of PTO Balance change (hours) on those accrual days.
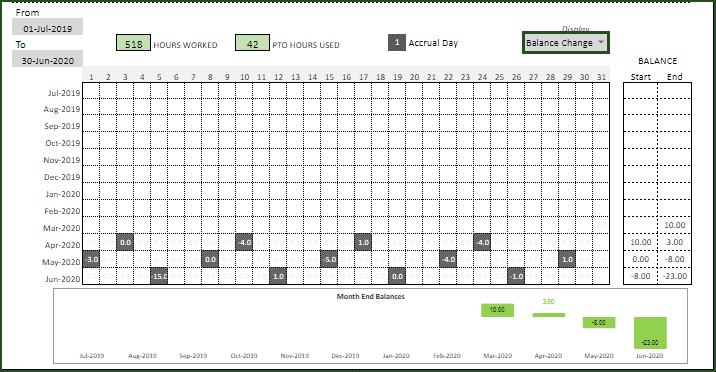
PTO USED
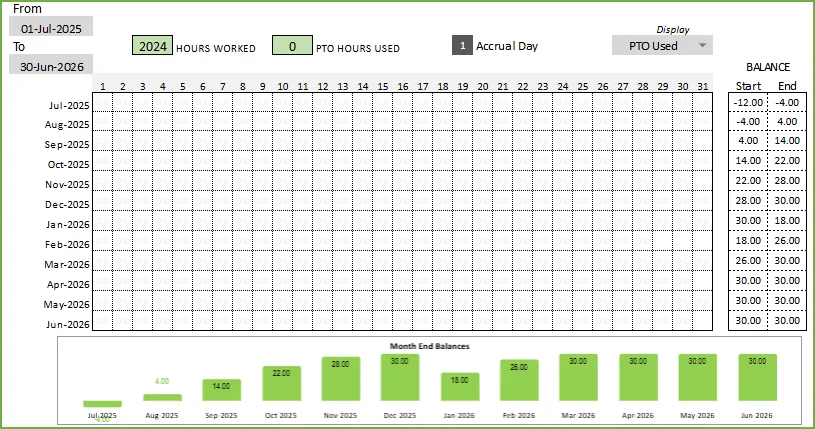
This will reflect the dates when the employee takes PTO and the number represents the number of hours of PTO used.
MONTHLY BALANCES
On the right side you can view the Monthly starting PTO Balance and Monthly Ending PTO Balance. Please note that all balances reflect at end of day.
MONTH-END BALANCE TREND
At the bottom of the report, the month-end balance trend chart shows the balances month over month.
PRINT OR EXPORT
You can Print the report or export to PDF and share.
BALANCE ADJUSTMENTS
If you would like to add or remove PTO to the balance outside the PTO policy settings you have entered, then you can use the Adjustment table. This allows you to add to PTO balance (enter positive value) or reduce from PTO balance (enter negative value).
For example, if you would like to reward employee with extra PTO, you can enter here as a positive adjustment.

This sheet can be ignored if you don’t need to make such adjustments.
I hope this free Google Sheet template is useful to track Paid Time Off (PTO) for hourly employees in your organization.


Leave a Reply