Property Rental Receipt 2023 – Free Excel Download
If you run a property rental business, download this free Property Rental Receipt Template to create simple and effective receipts in Excel.
You can save time by storing all your properties and agreement details, to create unlimited receipts and manage them all in one file.
Benefits of Property Rental Receipt Template
- Create printable payment receipts with minimal data entry.
- Save time by storing property, agreement and receipt data
- Choose One time setup for each agreement as monthly or daily or weekly
- Payment amount will be auto calculated automatically for the provided payment period, according to the agreement.
Limits
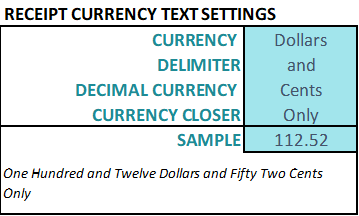
- Rental amount to text conversion is limited to billions.
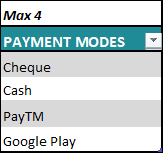
- Payment method is limited to 4.
- Rental period is limited to Monthly, Daily and Weekly.
Requirements
Microsoft Excel for Windows (2010 and above)
Microsoft Excel for Mac (2011 and above)
Free Downloads
Video Demo
How to create property rental receipts in Excel?
Initial Setup
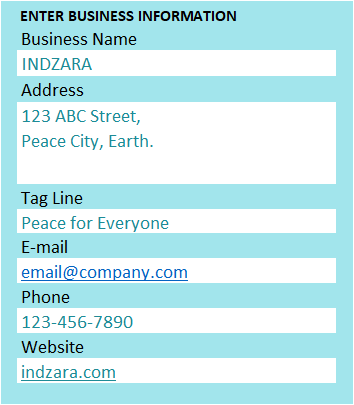
Enter Business Information in Settings sheet
Setup Amount to Text conversion currency value
Enter Available Payment Modes
Enter Properties in Property sheet
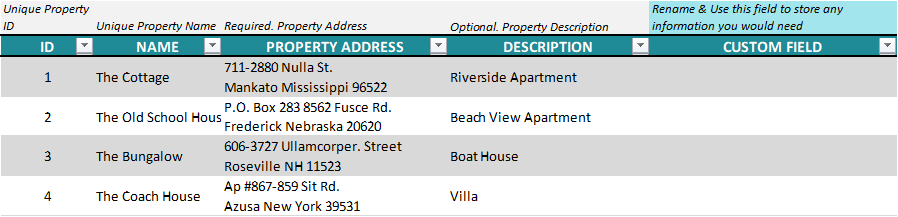
If you are new to Excel Tables, please read the article on how to use Excel Tables for data entry.
You can add columns or rename existing columns as you need. You can add more properties anytime.
Enter Agreements in Agreements sheet

Enter Agreement in Agreement table with rental information and monthly or weekly or daily rental rate
You can add columns or rename existing columns as you need. You can add more agreements anytime.
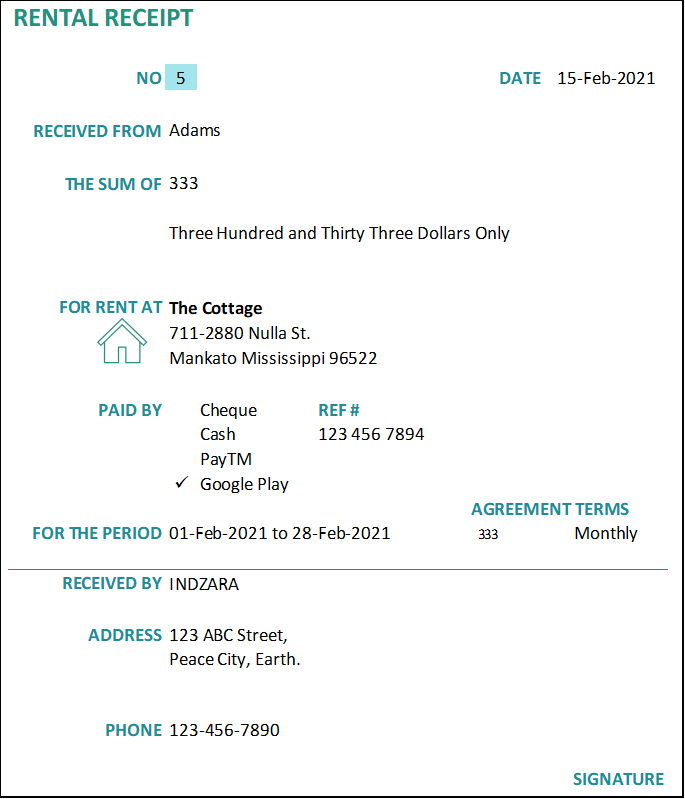
Create a Receipt with Rental Receipt Builder template
With our initial setup complete, it’s time to create our first receipt.
Overview of Steps
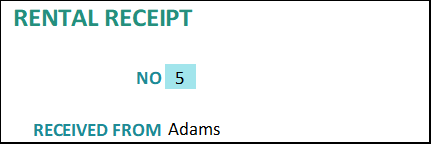
- Enter Unique Receipt number.
- Enter Receipt Date.
- Select Agreement number.
- Select Payment method.
- Enter payment reference number (Optional).
- Enter From and To date of rental period. Note: Amount will be auto calculated with this From and To date.
- Enter positive or negative Adjustment Amount (Optional).
- Agreement amount and final amount is auto calculated as agreement settings.

- Enter Receipt Number in Receipt sheet to select the receipt from Rental List.
- Press Ctrl+P to preview & Print/export to PDF
Printing or Exporting to PDF
After reviewing and making sure everything looks good, it’s time to print or export.
Press Ctrl+P to preview print.

Print Preview and Print Invoice
The page is set up to be print-friendly. So, you should be able to just print as it is.
To export to PDF, select the Export menu option.
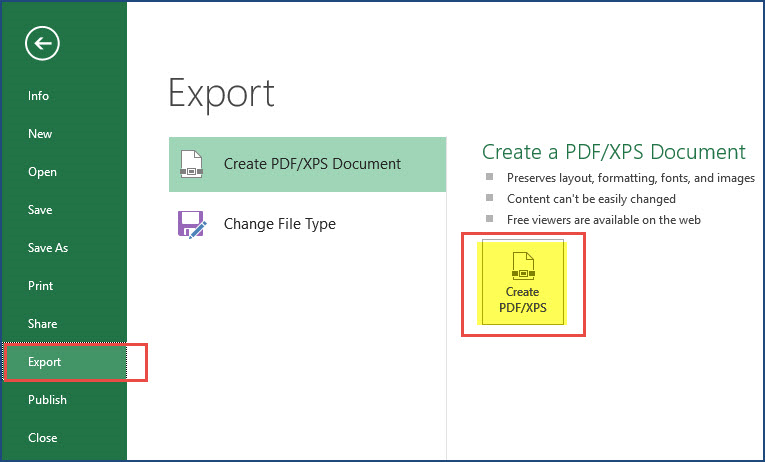
In the following window, choose a location in your computer to store the PDF file and give a name to it.
Tip: use your receipt number in the file name. Save all your receipts with the Receipt Number in the PDF file name in the folder. Thus, you will be able to easily identify a specific PDF if needed in the future.
How can I change the colors, fonts or other formatting?
All the formatting options are available to you. Just select the cells you need to modify format and use Excel’s default formatting options (in the Home ribbon) to change fonts, colors, appearance, number format or alignment.

If you change the font size or font, you can adjust the column widths and/or row heights to ensure that the print view is good.
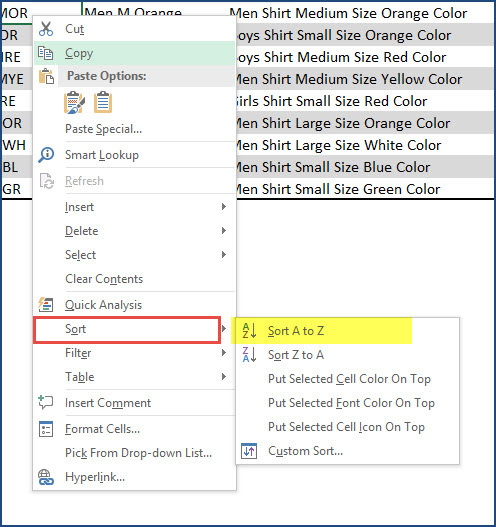
How to sort data in Property list?
When you have a lot of properties to manage, it might become challenging to choose from the drop down menu in the Agreements worksheet, especially if the property IDs/Names are not sorted.
By default, the order in which you entered the properties in the Properties table will be used as it is in the drop down menu. That means you could sort the properties in the Properties table and this would automatically give you sorted properties in the drop down menu.
This should help you in easier selection of properties in the Agreements.
Choose the cells in the Properties table, Right Click –> Sort.
Leave a Reply