2023 Invoice Template – Invoices for Small Businesses
If you run a small business selling products, download this Free Sales Invoice Template and create invoices easily in Excel. You can create unlimited invoices and manage them all in one file. You can save time by storing your products and customers once and re-using them for invoices whenever needed.
Features of Invoice Template
- Create professional sales invoices for your small business instantly
- Customize it to your need
- Customize customer data that appears on the invoice
- Change columns (2 columns are flexible) in invoice
- Discounts can be set as amounts or %
- Logo and other formats like colors or fonts can be changed as preferred
- Currency can be set easily to suit your business need
- Automatically calculate totals and subtotals
- Handles tax rates at order level
- Accommodates products that are not taxable
- Handles discounts at product and order levels
- Save time by storing customer and product data
Limits
The template is designed to accommodate 20 line items per invoice.
Requirements
- Microsoft Excel for Windows (2010 and above)
- Microsoft Excel for Mac (2011 and above)
Download
Video Demo
How to create invoices
Initial Setup
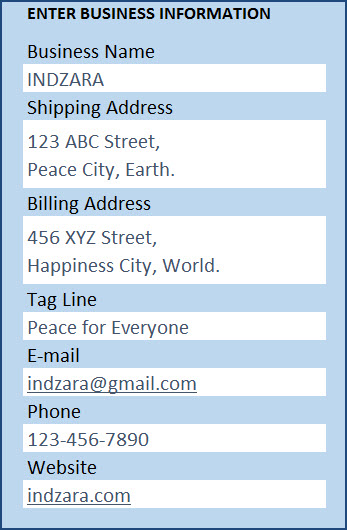
Enter Business Information in Settings sheet
Enter Products in Products sheet
If you are new to Excel Tables, please read the article on how to use Excel Tables for data entry.
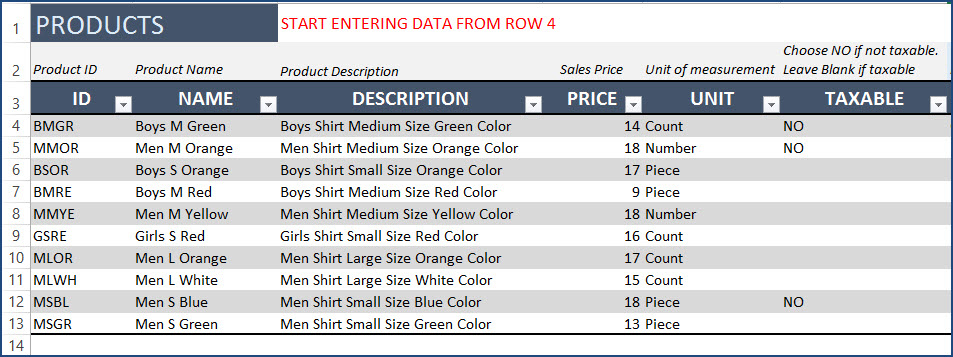
You can add columns or rename existing columns as you need. You can add more products anytime.
Enter Customers in Customers sheet
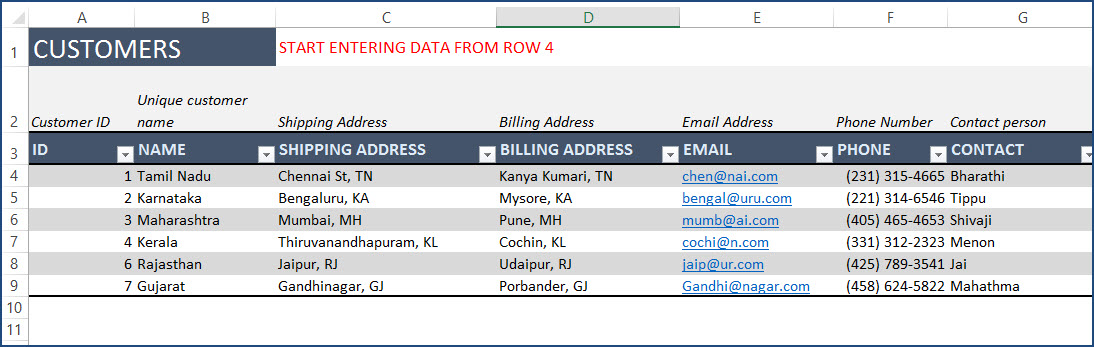
You can add columns or rename existing columns as you need. You can add more customers anytime.
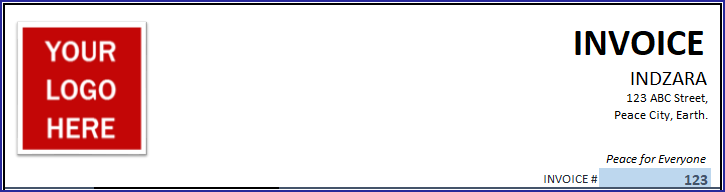
Change Logo in Invoice sheet
Right Click on the logo image and choose ‘Change Picture. Select an image from your computer to replace.
If you don’t need a logo, just select the logo image and press the Delete key.
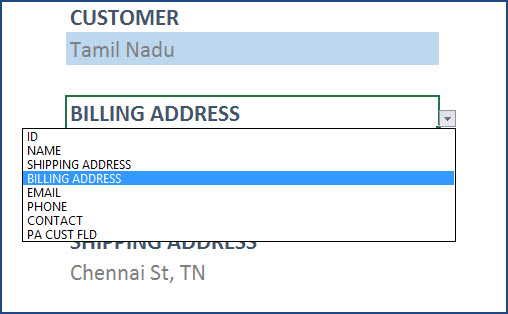
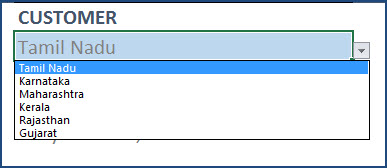
Customize Customer Information on Invoice
It’s easy to customize the appearance by selecting which field should appear.
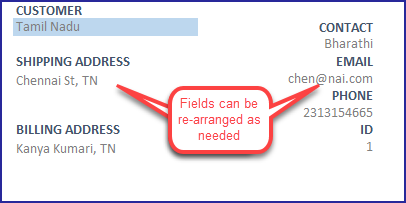
7 fields can be customized. The list of information available in the drop down is based on columns in the Customers sheet.
Enter Tax Rate % in Invoice sheet
Enter Tax Rate in cell I50. You can change this later for each invoice if needed.
Apply Currency format in Invoice sheet
The template comes with no currency formatting by default as I would like the template to be useful in all countries. It’s easy to apply your currency.
In the Invoice sheet, press Ctrl+G. This opens a new dialog box.

Choose CURR and click OK. This will select all the cells that need to be formatted as currency. Press Ctrl+1.
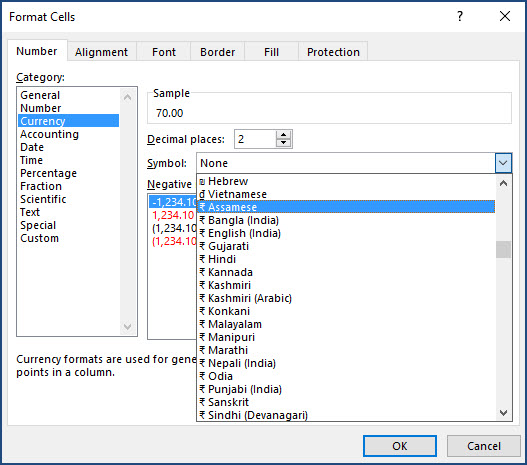
After selecting and pressing OK, the invoice will have currency format applied.
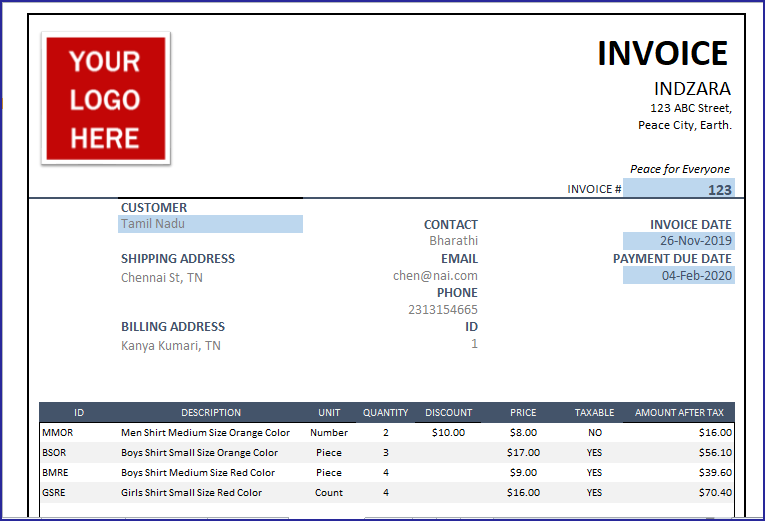
Creating an invoice with Sales Invoice Template
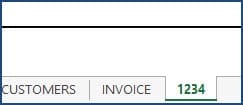
With our initial setup complete, it’s time to create our first invoice. First, let’s make a copy of the Invoice sheet.
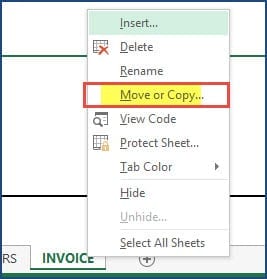
Rename the new sheet with the Invoice #. For example, for Invoice #1234, Let’s name the sheet 1234.
Now, we will create the invoice #1234.
Overview of Steps
- Enter Invoice # in cell J15
- Choose customer name in cell D17
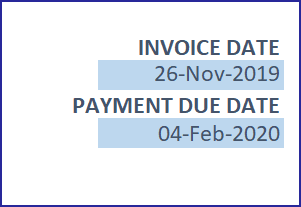
- Enter Invoice Date in cell J18
- Enter Payment Due Date in cell J20
- Enter Product ID/Name, Quantity & Discount
- Enter Tax Rate% in cell I50
- Enter Order Discount Amount/% in cell I52
- Enter Other charges, if any, in cell J53
- Enter any comments or notes in cell C51
- Press Ctrl+P to preview & Print/export to PDF.
Steps in Detail with Screenshots
1. Enter Invoice # in cell J15.
2. Choose customer name in cell D17
Other customer information will automatically populate.
3. Enter Invoice Date in cell J18
4. Payment Due Date in cell J20
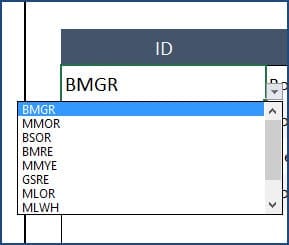
5. Enter Product ID/Name, Quantity & Discount

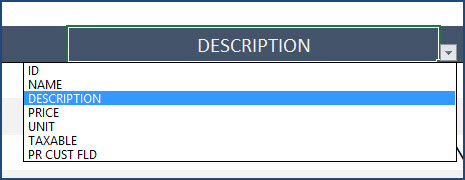
Choose Product ID from the list.
Description and Unit columns will automatically populate. If you would prefer some other attribute (or information) of products instead, you can just change it. How cool is that?
Enter Quantity and unit discount. The Price, Taxable and Amount will automatically populate.
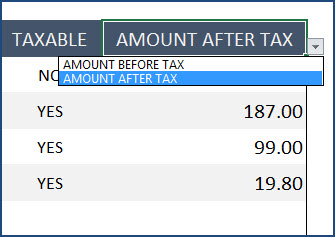
You can choose to display either Amount Before Tax or Amount After Tax.
Continue entering products as many there are in the invoice. The maximum allowed is 20 in this template.
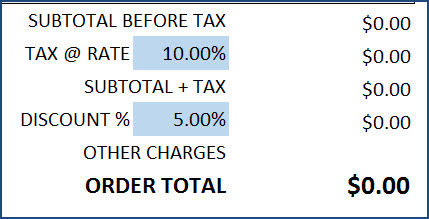
6. Enter Tax Rate% in cell I50
As we scroll down, we see the subtotal and total section. Here, we have two options. Enter Tax Rate% in cell I50.
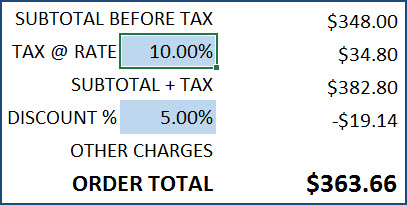
7. Enter Discount
Next is Discount, where we can choose to use Discount Amount or Discount %.
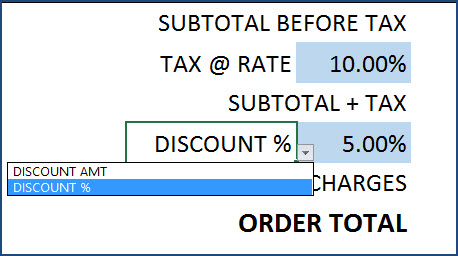
If you choose Discount %, enter the value in decimals. For example, 0.01 for 10%. If you do not want to display any discount, just clear the cell.
8. Enter Other Charges
Enter Other Charges, if any, in cell J53. You can rename Other Charges to anything that applies. For example: ‘Shipping Charges’.
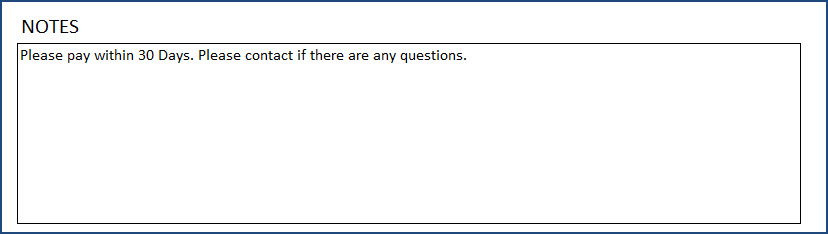
9. Enter Comments
Enter any comments or notes in cell C51.
10. Printing or Exporting to PDF
After reviewing and making sure everything looks good, it’s time to print or export.
Press Ctrl+P to preview print.
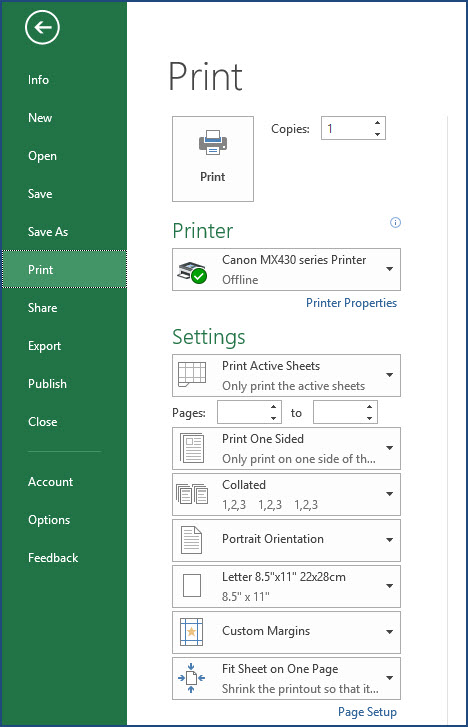
The page is set up to be print-friendly. So, you should be able to just print as it is.
To export to PDF, select the Export menu option.
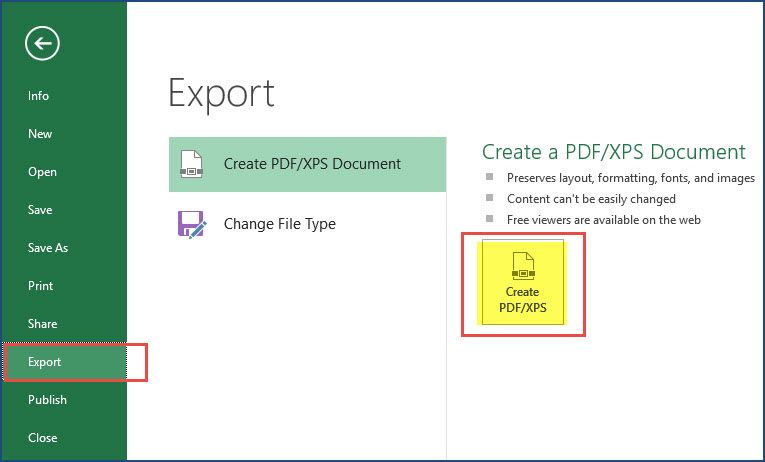
In the following window, choose a location in your computer to store the PDF file and give a name to it. Tip: use your invoice number in the file name. Save all your invoices with the Invoice Number in the PDF file name in the folder. Thus, you will be able to easily identify a specific PDF if needed in the future.
Related Free Templates
Track invoices and due amounts in a simple free Invoice Tracker template
Manage inventory along with invoices using Retail Business Manager
Recommended Premium Templates
Please try our premium Invoice Manager templates to manage all invoices and track unpaid invoices, available for Excel and Google Sheets.
With Invoice Manager Pro, get to print invoices along with managing invoices and payments for your small business, with a simple excel spreadsheet.
Extensions
What if you sell hourly services?
You can also use this template for services that you may charge hourly. In such cases, you will enter the number of hours in the Quantity column in the invoice. In the Products table, you will enter the Service name and provide the hourly rate as the Price.
What if it is consulting projects and not hourly?
You can also use this template if you work on consulting projects. You can enter your Project ID in the ID field, Project Name in Name field and enter Project description in the Description field. You can enter the project’s cost in the Price field. You can enter Quantity as 1.
What if you want to use Product Name instead of Product ID as unique identifier?
You can choose to user Product ID or Product Name or your own field as key identifier of products. Just select the field in cell C28 in the Invoice sheet. Now, you can enter.
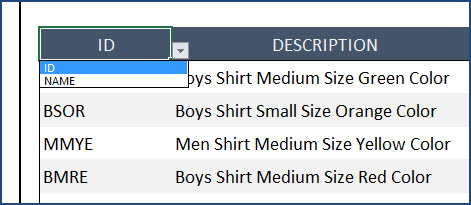
If you choose Name, the drop down list automatically will use Product Name instead of Product ID. Everything works smoothly.
How can I change the colors, fonts or other formatting?
All the formatting options are available to you. Just select the cells you need to modify format and use Excel’s default formatting options (in the Home ribbon) to change fonts, colors, appearance, number format or alignment.

If you change the font size or font, you can adjust the column widths and/or row heights to ensure that the print view is good.
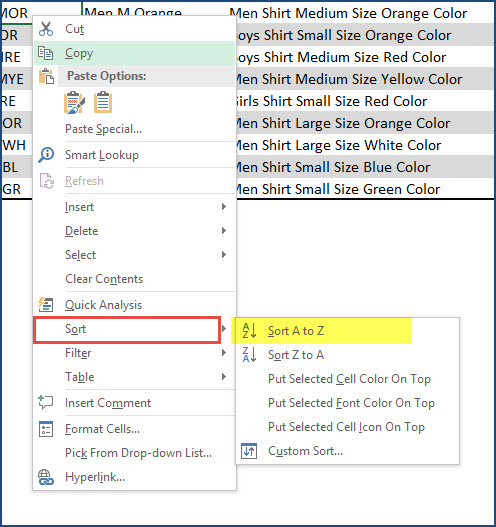
How to sort data in Product list?
When you have a lot of products, it might become challenging to choose from the drop down menu in the Invoice worksheet, especially if the product IDs/Names are not sorted. By default, the order in which you entered the products in the Products table will be used as it is in the drop down menu. That means you could sort the products in the Products table and this would automatically give you sorted products in the drop down menu. This should help you in easier selection of products in the invoice.
Choose the cells in the Products table, Right Click –> Sort.
For more small business templates, please visit Small Business Excel Templates
56 Comments
Dear Indazara,
I’m looking for Sales Invoice Template: GST MODE.
Amazing! Thanks a lot!
Thank you very much for your feedback. Best wishes.
Can the customer and product information be populated from the data entered into your Excel Inventory Rental template automatically as not having to retype it? I suppose I’m asking if a merger of certain fields of the packages can be done in some way. If so how?
Can you please review the Rental Business Manager template that combines product, customer, inventory and accounting functions? https://indzara.com/product/rental-inventory-sales-manager-excel-template/ Best wishes.
I have bought the business retail manager file, also I download some other free forms, what I want to say that they are really made in a professional way , they are very useful and helpful for running my own business
thanks a lot
Thanks for purchasing. I am glad to hear that the templates are useful. Best wishes.
Hi
How to create second invoice after prepare 1st invoice
Please create a copy of the invoice sheet to create more invoices. Thanks. Best wishes.
Can the invoice be modified to increase the line capacity? For example perhaps 100 lines?
Thank you,
To add an extra line, you can copy row 48 and then insert as copied cells above. You can use this approach for a few lines until you cannot fit the invoice in one printable page. Beyond that, we have to build another page.
Best wishes.
Hello, I need someone to build me a simple excel or access invoice template but I need a special output format that is simple but I don’t have enough experience to do. It will be a paid project if you agree.Regards. Please contact me on my mail
Thanks for your interest. I have emailed a response. Please email me the specific requirements and I can let you know the cost of development. Thanks.
you are great boss superb _/\_
Thanks. Best wishes.
super sir, i need same and automatic quantity also when u enter invoice number u get every thinks also amount and price and items and company name only invoice number
Thanks.
I am sorry that I am unable to understand your need. I will respond to your email on this topic. Best wishes.
I would like to change invoice but I need password please
Please use indzara as password. Thanks. Best wishes.