2025 Leave Tracker & Vacation Tracker Excel Template
Introducing the Leave Tracker Excel template – Your Ultimate Solution for Streamlined Leave Management!
Are you a HR Manager, a Small Business Owner, or a Project Manager? Regardless of your role, if you’re tasked with managing employee leave, vacations, and time off, this Free Leave Tracker Excel template is your essential tool for efficient and organized leave management.
This Excel template is designed for Microsoft Excel, but if you are looking for a Google Sheet template, please visit Employee Leave Vacation Tracker in Google Sheets.
Here is a sample of Leave Tracker dashboard you can create instantly using this Excel Template.

Features of Employee Leave Tracker Excel Template
The following are the highlights of the template.
- Customize settings to meet your business needs
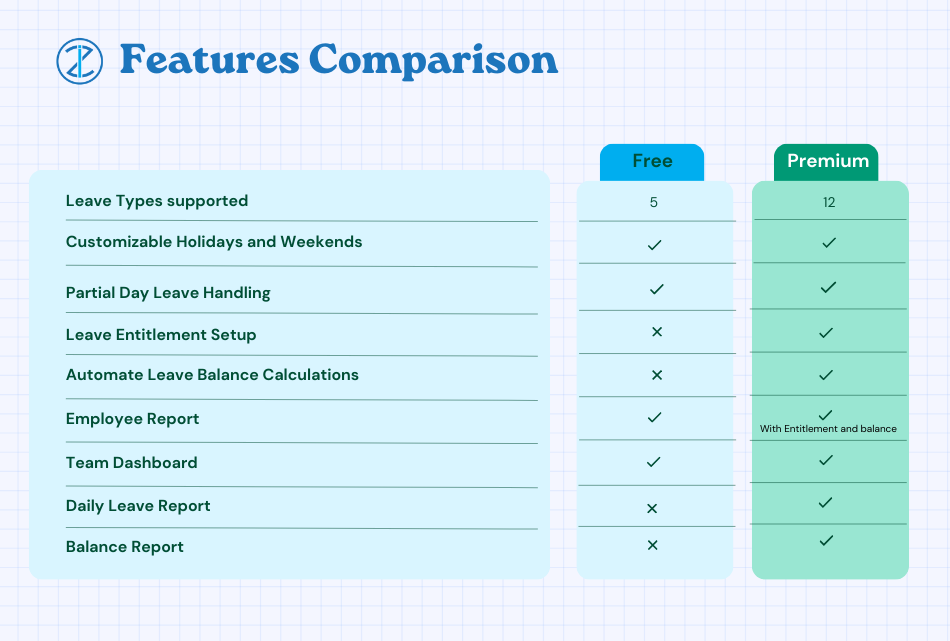
- Track 5 types of employee leave (For up to 12 leave types, try Employee Leave Manager template)
- Customize which days are weekends (not working days)
- Account company holidays
- Practical Features
- Track vacation for multiple employees
- Employees can have start dates and termination dates
- Can handle partial days of leave
- Ease of Use
- Easy to enter Leave in ranges of dates
- Easy to customize colors to suit your preferences
- Can use the template continuously for many years (keep all your data organized in one file :))
- Automated Calculations
- Fully Automated Vacation Tracker Dashboard with monthly calendar view
- Calculates Worked Days automatically
- Automated Annual Employee attendance report
Downloads
Do check our Employee Leave Manager in Excel for additional features

How to use the Leave Tracker Excel Template
The template has 5 visible sheets. (Settings, Employees, Leave, Team Dashboard, Employee Report).
Here is the overview of steps to use the template.
- Enter Leave Types, Select Weekends and Enter Holidays in the Settings sheet
- Enter list of employees in Employees sheet
- Enter leave data for employees in Leave sheet
- Choose a month and view vacation calendar for the team in Team Dashboard sheet
- Choose an employee and view/print annual employee attendance report in Employee Report sheet
Detailed Steps
Now, let’s see the steps in more detail.
Before we begin, if you are new to Excel tables, please read Introduction to Excel Tables for data entry. Data entry in all our templates use Excel tables and a quick introduction to that will get you going in the correct direction.
Step 1: Enter up to 5 types of leave to suit your company
The template by default supports 5 types of categorizing your leave. Since different companies may have different names and different number of leave types, the template supports customizing them.
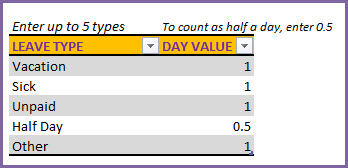
By default, you will see the leave types (Vacation, Sick, Unpaid, Half Day, Other). You can just type over these names and replace with your own preferred names.
How to handle half-day leaves
You can see that there is an option to assign ‘Day Value’ to each leave type. This setting is present to handle partial days of leave. For example, I have entered 0.5 for ‘Half Day’ leave type. That means that when an employee takes Half Day leave, template will add 0.5 to leave taken total and reduces the Worked days by 0.5.
If your company allows 2 hours leave in an 8 hour workday setup, that would be 0.25 day. You can create a leave type and enter 0.25 as ‘Day Value’.
Step 2: Select your company Weekends
In order to calculate attendance of employees automatically, we need to know company weekends so that we can remove them from working days.
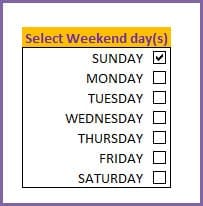
Since our goal is to provide a global solution to vacation tracking, we have the option of selecting any combination of weekend days. In the screenshot above, I have chosen Sunday as Weekend.
So, this tells the template to do 3 things.
- Template will highlight Sundays visually differently on the vacation dashboard
- While calculating attendance, it will not include the Sundays as Working days.
- Sundays will also not get counted as leave. When an employees takes Thursday to Monday as Vacation, it will count only as 4 days of leave (Thu, Fri, Sat, Mon).
Step 3: Enter company holidays
Enter list of holidays in your company.
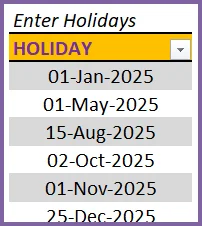
The template will treat the holidays similar to Weekends for calculation purposes, but holidays will be displayed in a different color on the calendar. This allows us to view holidays and weekends distinctly.
Step 4: Enter Employees’ data
Now, we move to the Employees sheet.
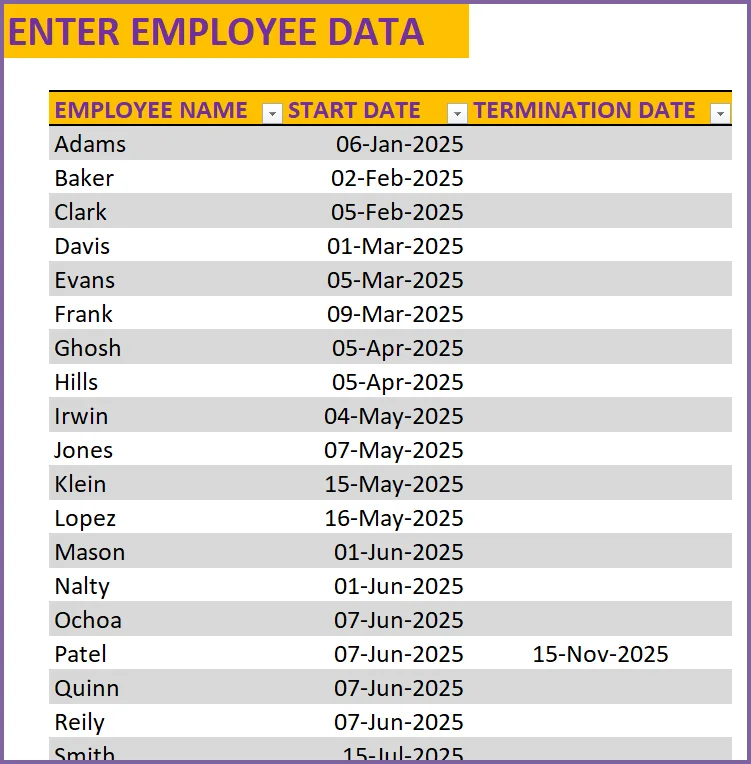
We will enter the Employee Name, Start Date (date when the employee began employment) and then Termination Date (if applicable). The Start Date and Termination Date allow the template to calculate the count of working days for each employee correctly.
Since the template can help you manage leave for multiple employees for long term windows (even many years, as there is no limit ), it is quite possible that new employees join the company and current employees may leave. I want the template to work smoothly for you even when that happens.
Step 5: Enter Employee Leave Data
Now, for the last data entry section, we move to the Leave sheet.
We enter leave taken by each employee here. There are four fields (Employee Name, Leave Start Date, Leave End Date and Leave Type) in this table.
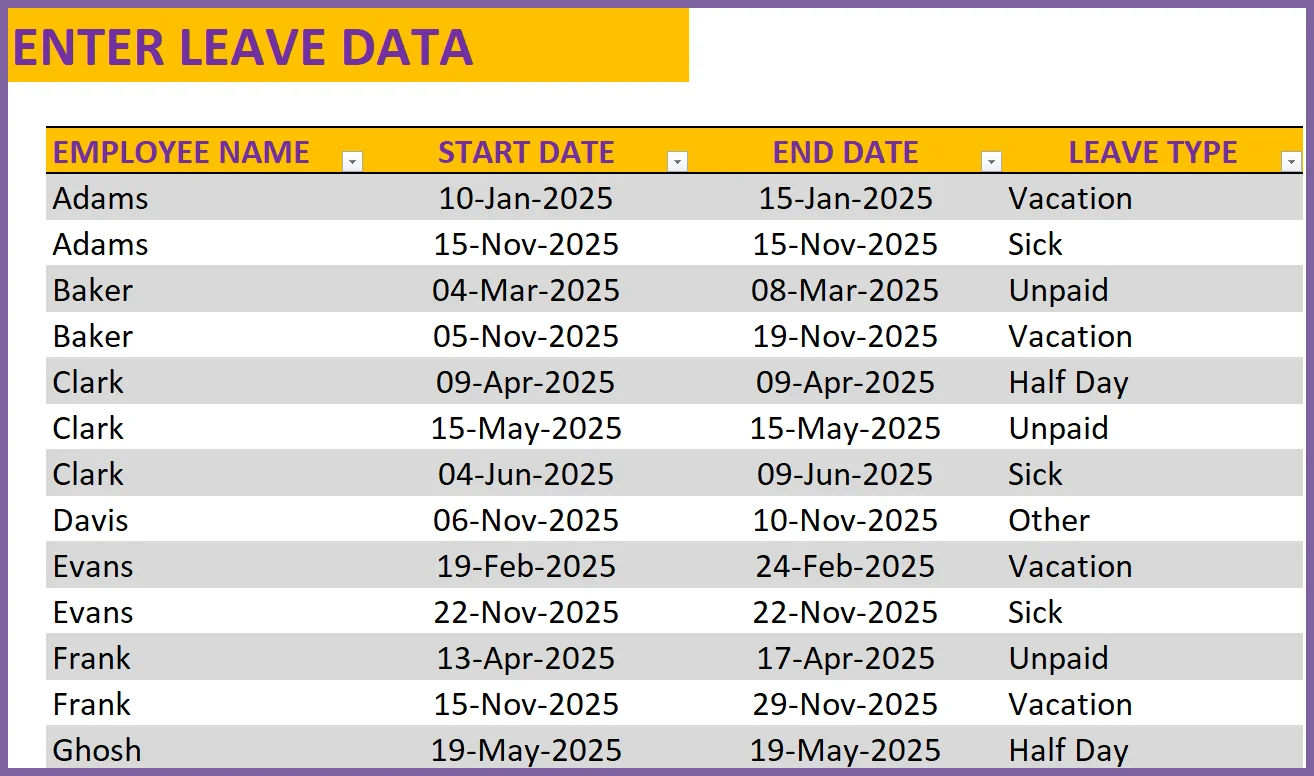
If an employee takes a 5 day vacation, you can enter that in one row by providing Leave Start and Leave End dates.
If an employee takes a single day leave, please enter same date in Start Date and End Date fields.
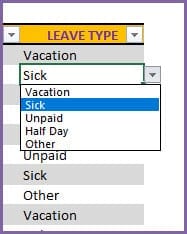
Leave Type field has data validation built-in which shows the 5 options we set in the Settings sheet.
We are done with data entry. It’s time to see the template’ magic in creating the vacation calendar and report.
Step 6: View Team’s Monthly Leave Dashboard
The dashboard is interactive as it allows the user to choose the month for which we want to view the leave data for. We will enter the month by selecting Year and Month.
There are two pages in this Dashboard sheet. First is the leave calendar view.
As you can see from the above screenshot, the leave types are shown in different color. The legend is shown at the top indicating what each color means. In addition to the 5 leave types, we also have display for the following: Holidays (purple), Weekends (Dark Gray), Not Employed (Dot pattern) and Not Applicable (Diagonal Line pattern).
Order of priority for colors: Not Applicable > Not Employed > Holidays > Weekends > leave types
Holidays and Weekends are self-explanatory. Not Employed will represent the days before the employee began employment and days after the employee termination date (if applicable).
You can use this calendar view to assess if you will have enough coverage in your team for specific weeks (for example, during the holiday season).
Monthly Summary
This sheet also shows the monthly summarized count of days taken off under each leave type, total leave taken and Worked Days.
Total Leave is the sum of leave taken under each of the 5 leave types.
If an employee’s leave overlaps with a holiday or a weekend, it does not count as a leave day.
Worked Days is calculated as (Company Working days – Holidays – Weekends – Not Employed Days – Total Leave days)
Worked days represents the number of days an employee worked or is scheduled to work.
You can look at this view during the last week of a month, to calculate the next month’s capacity (in work days) for the entire team. This will be helpful to evaluate whether you have enough capacity to meet the demand (work) ahead in the next month.
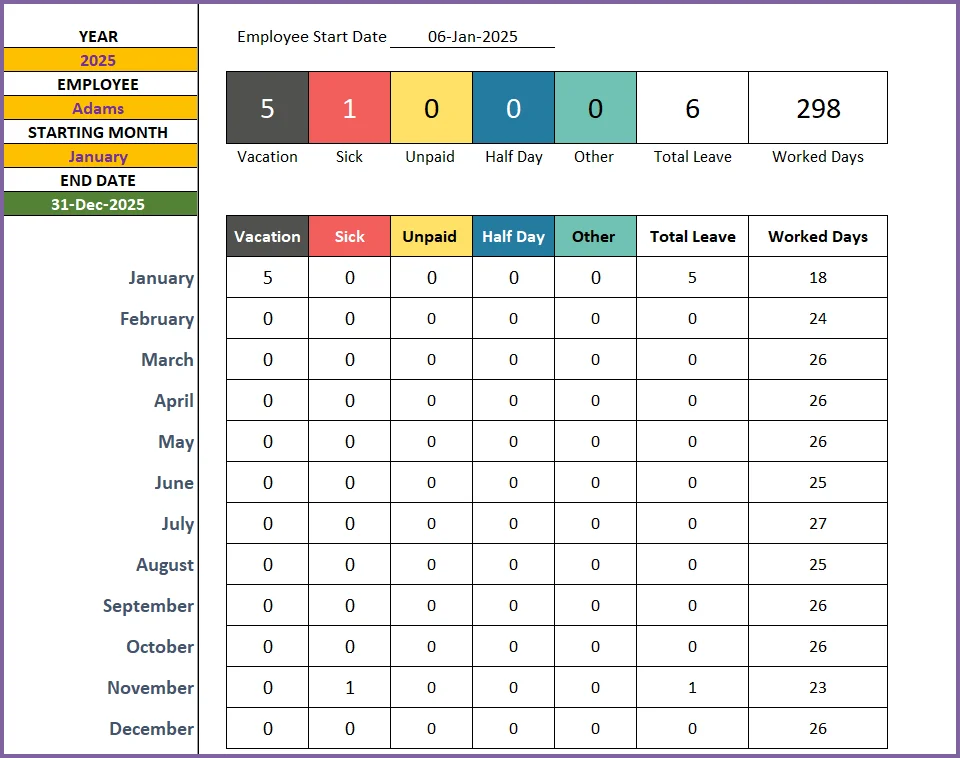
Step 7: View Annual Employee Attendance Report
While the previous sheet was about viewing all employees at once in a calendar view one month at a time, we also need to see one employee’s data across months. This is where the Employee Report comes in handy.
Here we have three inputs.
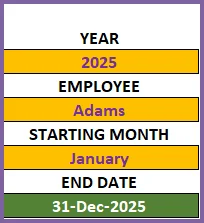
The Year and Employee Name selections should be easily understandable.
The report has the flexibility to allow you to choose the Starting Month from which you need the report to be generated. Once these inputs are chosen, the template automatically calculates the End Date. This is based on whether the employee is no longer with the organization, then the termination date is considered the End Date or the latest date in the Report is considered End Date.
That is, in the above example, the End Date is the last date of the current Employee Report for Clark since he is still with the organization.
This sheet has 2 pages as well. First, the calendar view.
As we discussed with the Team Dashboard, the colors and the legend work the same way. For the chosen employee and year, we can visualize the complete year’s leave patterns.
The second page presents the summarized count of leave and worked days.
Recommended Template
EMPLOYEE LEAVE MANAGER
-
 Employee Leave Manager Excel TemplateOriginal price was: $50.$40Current price is: $40.
Extensions
How to extend the functionality of the template?
What if I don’t need 5 leave types
No problem. You can just remove additional leave types easily.
In this example, I have selected last 2 rows of the Leave Type table. Then, right click to bring up the menu that you see in the image below.
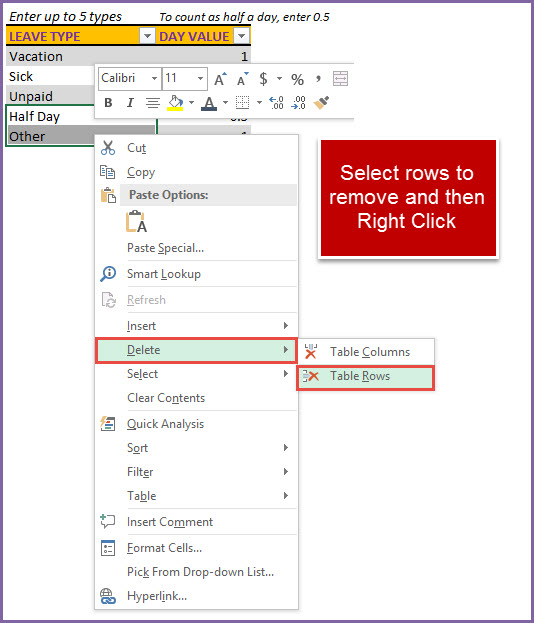
Click on Delete –> Table Rows.
This will remove the two rows and you will be left with 3 leave types to track for your company. That’s how easy it is. 🙂
How to enable drop down values for Employee Name in the Leave Table?
First, we will extend the table to additional empty rows. Click on the end of the table and drag down.
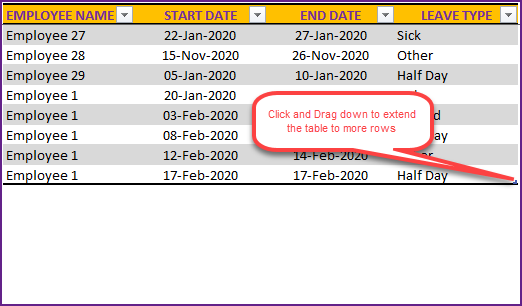
Once you do that, the table will look like below, with new empty rows.
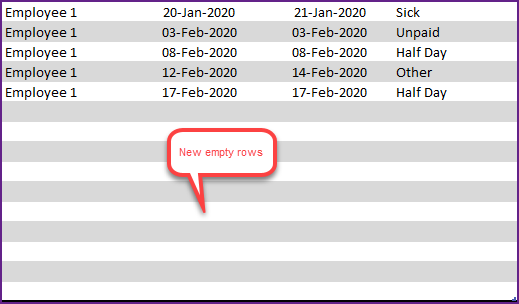
Now that you have new rows inside the table, the drop downs for both Employee Name and Leave Type will work.
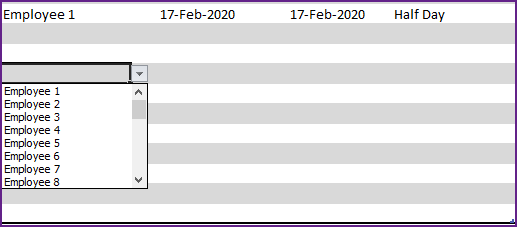
It is recommended that you add only a few empty rows at a time. The more rows we have, Excel has to process more data when it is performing calculations needed for our dashboard and employee report. This could slow Excel down.
Can I remove employees from the file?
On occasions, you may want to remove an employee’s name from the file if he/she has left the team.
- Select the employee’s name in the Employees’ sheet
- Right Click and Choose Delete —> Table Rows
You can also remove the employee’s leave data from the Leave sheet, but that is optional.
How can I share this file with my team?
- Print
- Press Ctrl+P or select Print from the File menu.
- Both Team Dashboard and Employee Report are set up ready for printing
- Export to PDF
- From the File menu, select Export and click on ‘Create PDF/XPS‘
- Select the location to store the PDF file on your computer
- Provide a name to the PDF file and click Publish.
- You can then email the PDF to your team members or post in your local shared drive.
I don’t like the colors. How can I change them?
Colors are personal preferences. Sometimes, you may want to use your company’s color palette in the documents. Not a problem. Let me explain how you can change the colors used in the template.
As an example, I will show how to change the Holidays color.
Open the Conditional Formatting menu from Home ribbon.
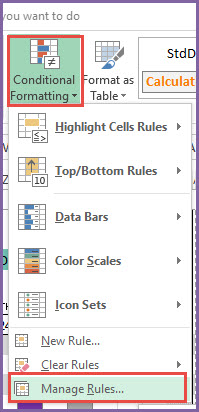
Select ‘This Worksheet’ to show formatting rules used in the current sheet.
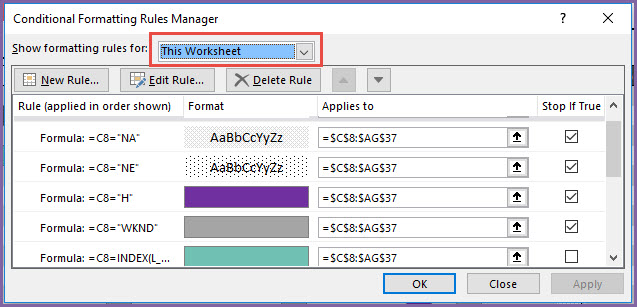
At the top, you will see the rules used to highlight Not Employed, Not Applicable, Weekends and Holidays.
Let’s select the Holiday rule (the purple one) and then click on ‘Edit Rule’.

In the next window, click on Format to choose the new formatting.
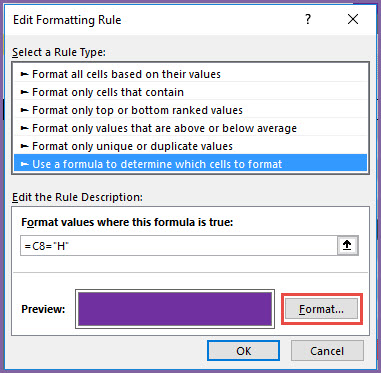
Now, you can see the option to choose a color.
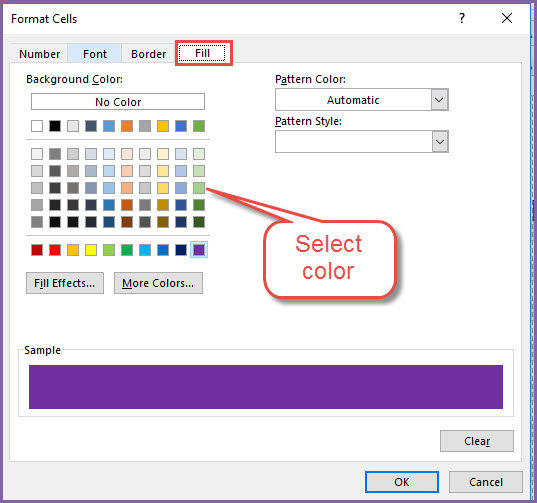
Select the color you prefer and click OK. You will need to click OK in the next couple of dialog boxes as well. Now, you should see the holidays represented in a different color.
You can then save the file (Ctrl+S) to save your changes.
In the conditional formatting rules, when you scroll down, you will see the colors used for the 5 leave types.
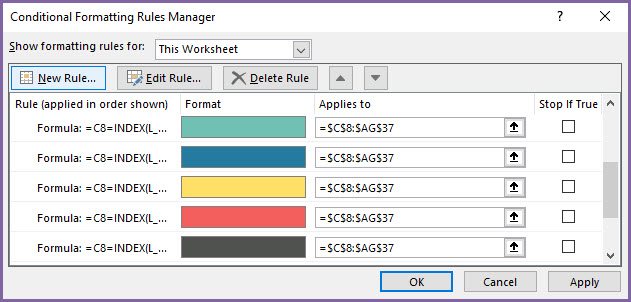
Click on those rules and change colors if needed. The procedure is the same as we did for the Holidays.
How can I edit the formulas? The sheets are protected.
You can unprotect the sheets using indzara as password.
If you are new to this, please read this article on unprotecting/unlocking sheets.
What if I have more than 30 employees?
You can enter more than 30 employees in the Employees sheet. There is no limit imposed here. However, the Team Dashboard shows only 30 employees. To extend that, follow these steps. To support 35 employees,
- Unprotect the Team Dashboard sheet with the password
- Select cells B36:AO36 (this is the row of Employee 29)
- Drag down for 6 rows as to fill them with the formulas.
Now you should see 35 (29+6) employees accounted for. If you need to extend for more employees, follow the same steps but increase the number of rows you are copying.
If you print or export to PDF, adjust print settings accordingly to include these new additional employees.
How to add calculations such as Attendance %?
You can unprotect the Team Dashboard sheet and add calculations if needed.
For example, if you need to calculate employee’s attendance %, you can follow these steps.
- In cell AP8, type =AO8/(AN8+AO8)
- This calculates Attendance % as Worked/(Leave+Worked)
- Then, select cell AP8 and drag down to fill the cells AP9 to AP37.
This will add a column of Attendance % to the Dashboard.
This was just an example. You can add any other calculations as needed for your company’s needs.
How to create Leave Tracker in Excel
A fully self-paced video course explaining each step in building this template is available.
I hope this template is useful. If you like it, please share it with your friends. If you have any suggestions or questions around tracking vacation in Excel, please leave them in the comments section. I will continue to enhance this template based on feedback.
695 Comments
Good day
I have used your template in 2022 and would like to continue to use it this year as all the settings have been customized. However, the template calendar does not seem to update when I enter 2023.
Please advise on what to do.
Thank you for using our template.
The template will work with the start date as 01-Jan-2023 in the calendar and employee report. If you are facing issue, please share your sheet at the below link to assist further:
https://support.indzara.com/support/tickets/new
Best wishes.
Hello! Thank you for sharing this amazing template with us!
My workplace has multiple employees who’s hired only for working less that 100%. Their work load may differ from each week. I tried to find a solution to this problem, but i figured that it’s best to ask if you have a solution that may help me with my issue? Or perhaps a different template.
Best regards from Norway!
You are welcome and thank you for sharing your valuable feedback.
Please check our Resource Capacity Planner template at the below link:
https://indzara.com/product/resource-capacity-planner-excel-template/
Best wishes.
this template is not working with Google sheets when imported. There is a Reference error all over the sheet
Thank you for showing interest in our template.
Currently, the features in Excel are not 100% compatible with Google Sheets and vice versa. Hence we have a separate version of the template for Google Sheets. Following is the link to the same for quick reference:
https://indzara.com/2020/03/employee-leave-vacation-tracker-free-google-sheet-template/
If you want to work online and offline, then you can upload the Excel template to Microsoft OneDrive an use Excel online, which is similar to Google Drive and Google Sheets. But Google Sheet template will not work offline in Excel.
Best wishes.
Also I am trying to change the holidays for 2023 and the password will not unprotect the settings tab but will unprotect other tabs.
The settings sheet is not locked in the template.
Please let us know you concern on entering 2023 holiday with some screenshots highlighting your concern at the below link to check further:
https://support.indzara.com/support/tickets/new
Best wishes.
Is there an option to enter the amount of PTO for each employee on their annual PTO report to create a “countdown” from beginning to end of year?
Thank you for showing interest in our template.
The requested feature is available in our premium version of the template. Following is the link to the same for quick reference:
https://indzara.com/product/employee-leave-manager/
Best wishes.
Greetings. Highly appreciated your template. However, I am running into this issue:
My input: employee A leaves on 13 Dec. 2022
The output: employee A leaves for all Dec. 2022, except for 13 Dec. 2022.
Checked that the date format and other info is correct. Wonder that this is a common issue or not, and how can I fix this issue.
Thank you very much!
Thank you for showing interest in our template and sharing your valuable feedback.
Usually, the data entry error would occur on the start or end date’s year. If both the start and end date has same year, please share your sheet to us from the below link to assist further:
https://support.indzara.com/support/tickets/new
Best wishes.
Hi
This vacation tracker is amazing! Can you send me one for 2023?
Thank you for showing interest in our template and sharing your valuable feedback.
The same sheet can also be used for 2023 or any year. The yellow colored fields are editable in the template. Hence at the top left of the Team Dashboard and Employee Report you will have the option to change the year.
Best wishes.
I love the Employee Leave Tracker, but how can I view different years at one time? Ex. We are a school so I need to be able to see how many days they used that school year not the physical year. I need to be able to view Aug. 2022- July 2023 instead of just Jan.-Dec. 2022. Is this possible?
Thank you for showing interest in our template.
The requested feature is available in our premium version of the template. Following is the link to the template for quick reference:
https://indzara.com/product/employee-leave-manager/
Best wishes.
Hello. How can I enter two separate leave periods for one employee? Thanks
Thank you for showing interest in our template.
You need to enter the same employee name again in a new row and provide a different leave period.
Best wishes.
Is there a way to have a calculation to figure out the “allotment” of hours each employee is entitled to? i.e. – year one – year 2 = 5 days
year three – year five = 10 days
etc.
Then have it subtract when vacation time is used?
Thank you for reaching out to us.
The requested feature is available in our PTO Manager template. Following is the link to the template for quick reference:
https://indzara.com/product/small-business-paid-time-off-manager/
Best wishes.